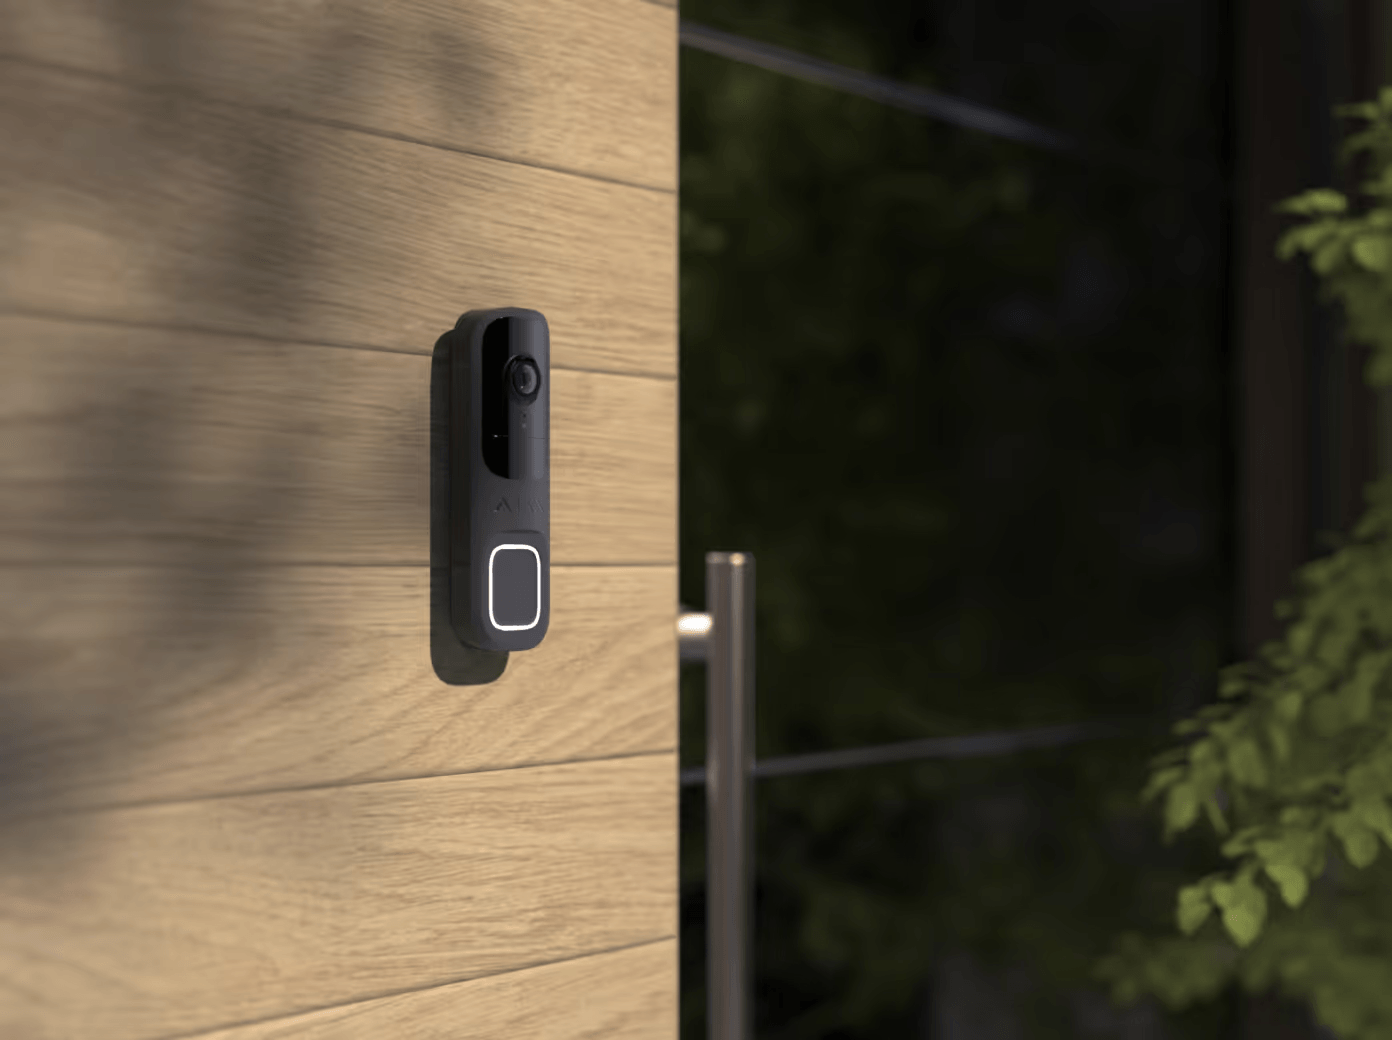
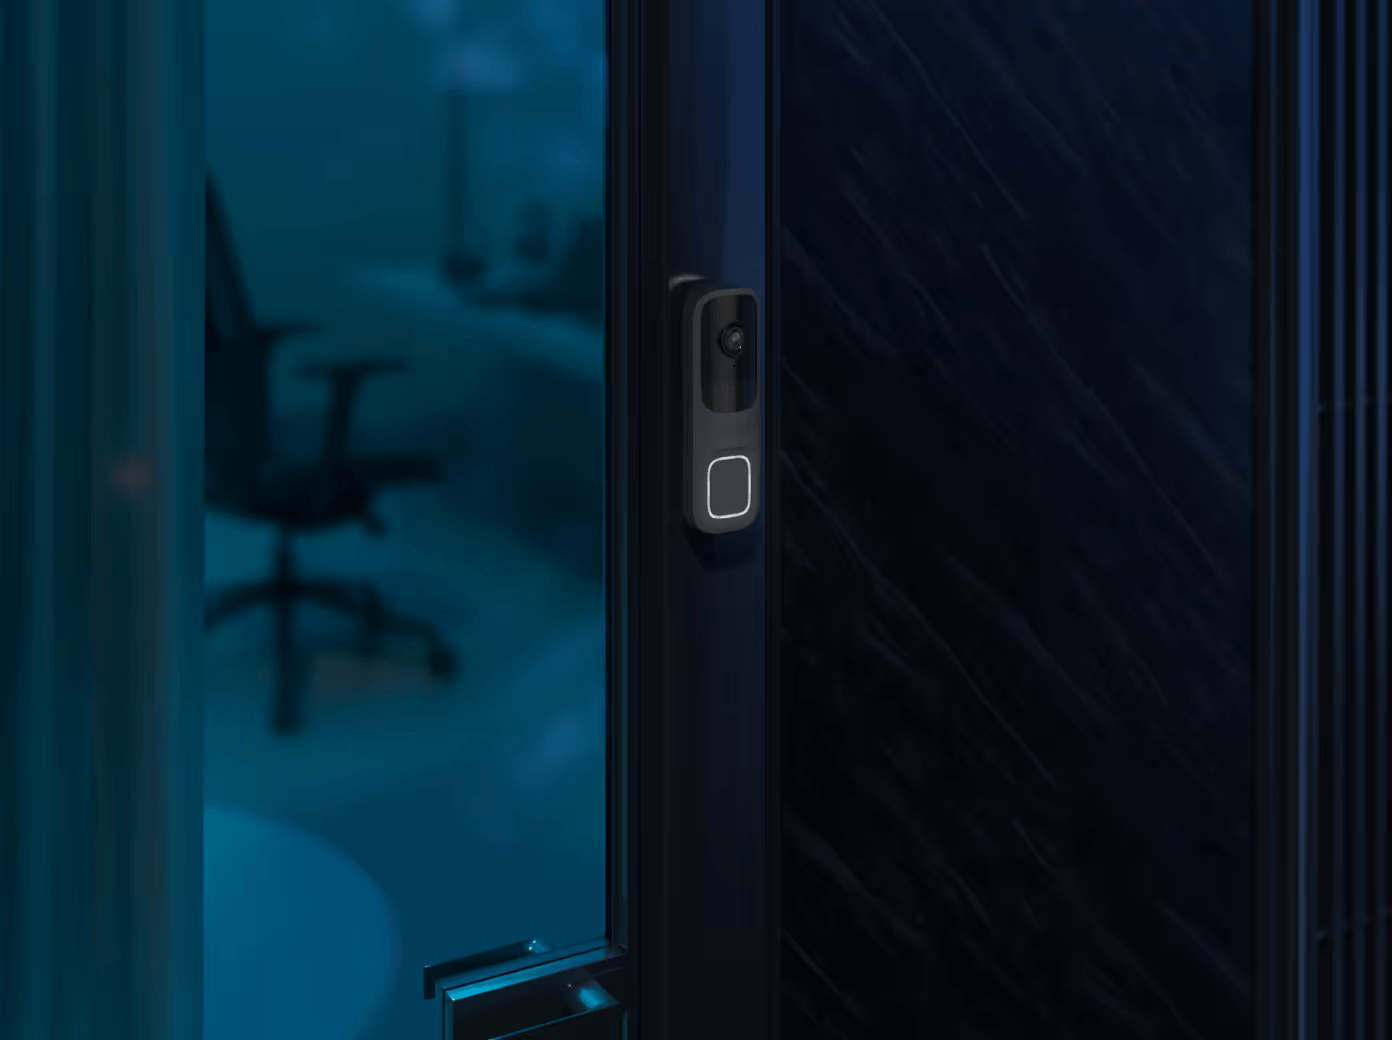
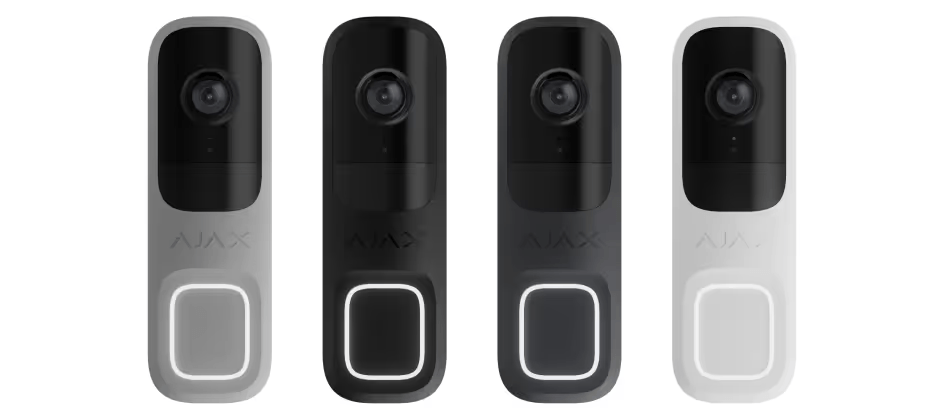
Ajax DoorBell

Retail price€ 431,97Fixed low price€ 243,95

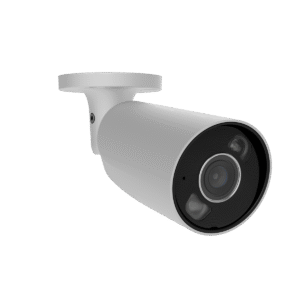
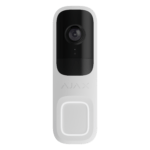
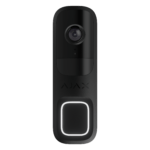
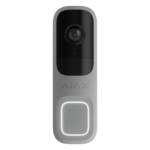
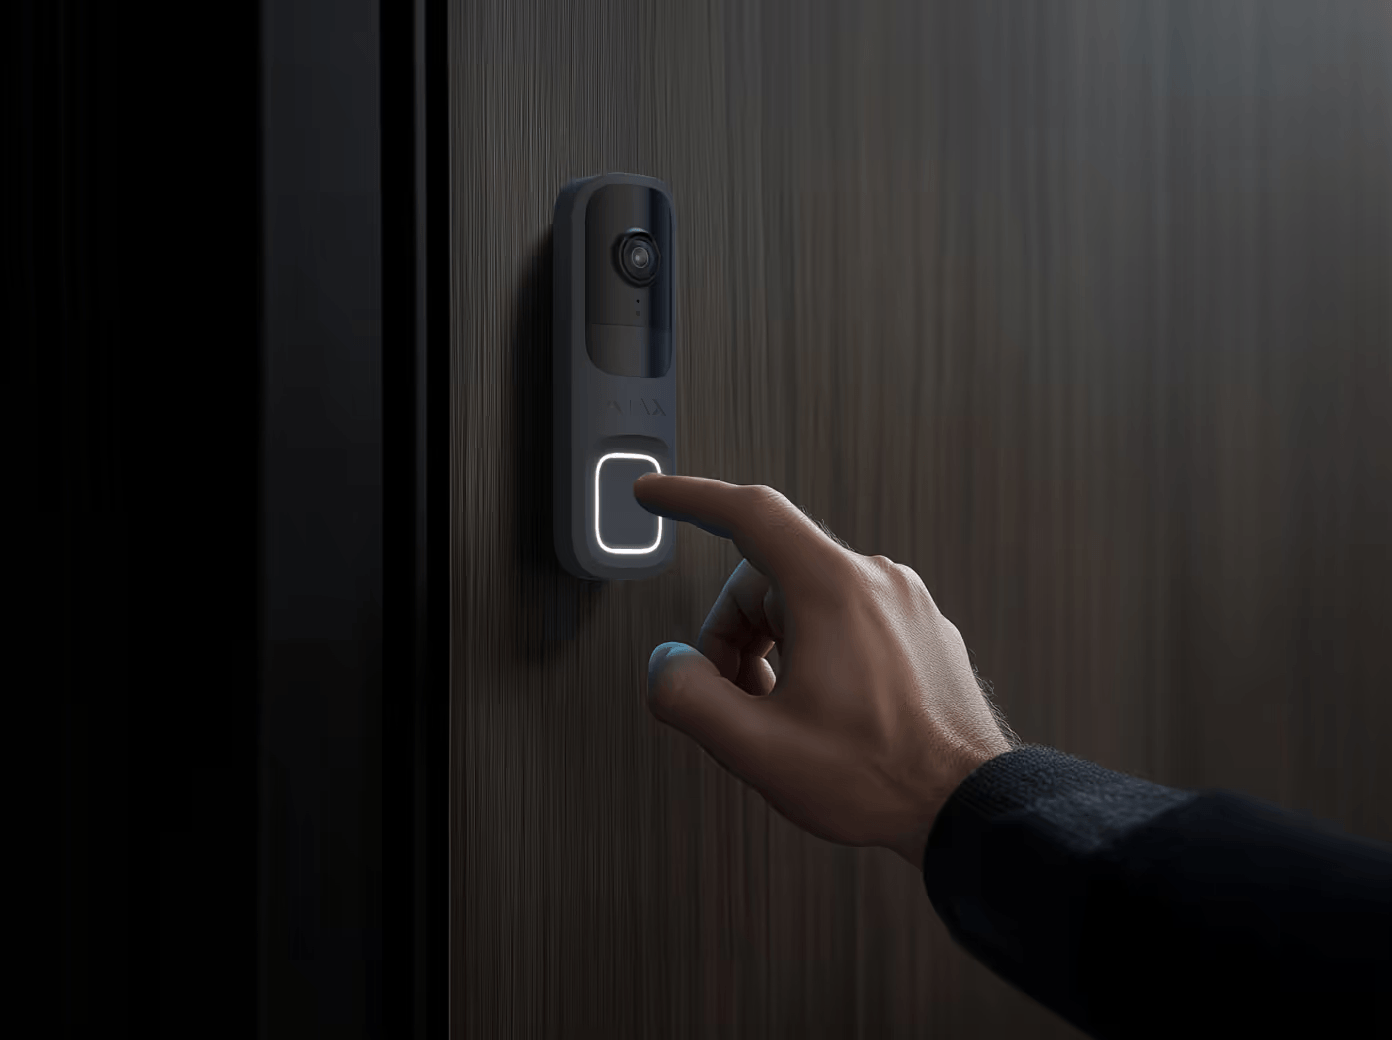
Ajax DoorBell, the smart video doorbell with intercom. See and speak to whoever rings the bell straight away, via the built-in speaker and the Ajax app.

OperationStandalone or with an Ajax Systems alarm system
Connection2,4 GHz Wi-Fi only
Camera4 MP with HDR
Wired doorbellKeeps working via the supplied BellKit
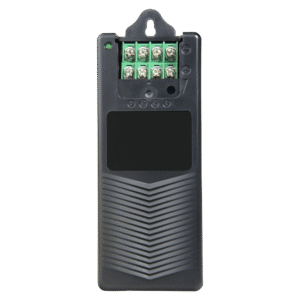
Power supplyExternal 12-24 V DC or 16-24 V AC. An 8 V bell transformer is not suitable.
12 V DC adapter or AC bell transformer (DIN rail)More about this in the description
(12 customer reviews)

Warranty: 2 Years

Frequently ordered together

Fixed daily price, no temporary offer. Our pricing policy

Authorised Ajax partner

Smart video doorbell

Ajax doorbell: smart video doorbell with AI and motion detection

Always want to know who is at your door? Then choose the Ajax DoorBell: a smart video doorbell with camera, built-in speaker and intelligent motion detection. Enjoy razor-sharp 4MP images and real-time communication via the Ajax app. Whether you are at home, on holiday or just at the neighbours'. You always know who is ringing.

Features

Key features

4MP HDR camera

Clear images, even in low light.

Two-way audio

Talk directly to visitors via your smartphone thanks to the built-in speaker.

AI-driven PIR sensor

Accurately detects people, animals and vehicles.

Standalone use

Also works without an Ajax alarm system.

Backup battery

Keeps working during a power failure.

Weatherproof (IP54)

Suitable for outdoor use.

In focus

The DoorBell in detail

Compatibility

Expandable with the Ajax alarm system

The Ajax alarm system is one of the best alarm systems available. As a premium partner of Ajax Systems, we see that it is the best solution for many households and businesses. Integrate the DoorBell with other Ajax products for additional functions such as backup communication and video storage.

Control

Simple installation and use

The Ajax DoorBell is easy to install and to operate via the Ajax app. Receive instant notifications when there is movement or when someone rings the bell, view live video and communicate with visitors, wherever you are.

Installation

How do you install the Ajax DoorBell?

The Ajax DoorBell has built-in AI, a motion sensor (PIR), two-way audio and live video via the Ajax apps. AI recognition detects people, vehicles or animals, even in low light thanks to smart IR illumination. You can store videos on an Ajax NVR or in the cloud.

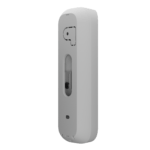
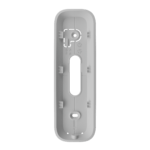
The DoorBell works via Wi-Fi and can be linked to an Ajax hub for backup communication via Jeweller and Wings. Installation is done with the supplied SmartBracket and brackets. It can be connected to a wired bell via BellKit, and to video management systems via ONVIF.

Connection examples

Connecting DoorBell to your existing chime

The DoorBell takes the place of your old bell push; your chime stays where it is and keeps ringing. The BellKit in the box connects to the chime and makes this possible: the DoorBell keeps its power, and the chime sounds as soon as someone rings. Below you will first find the principle, followed by the thirteen examples that Ajax has worked out for well-known chimes.
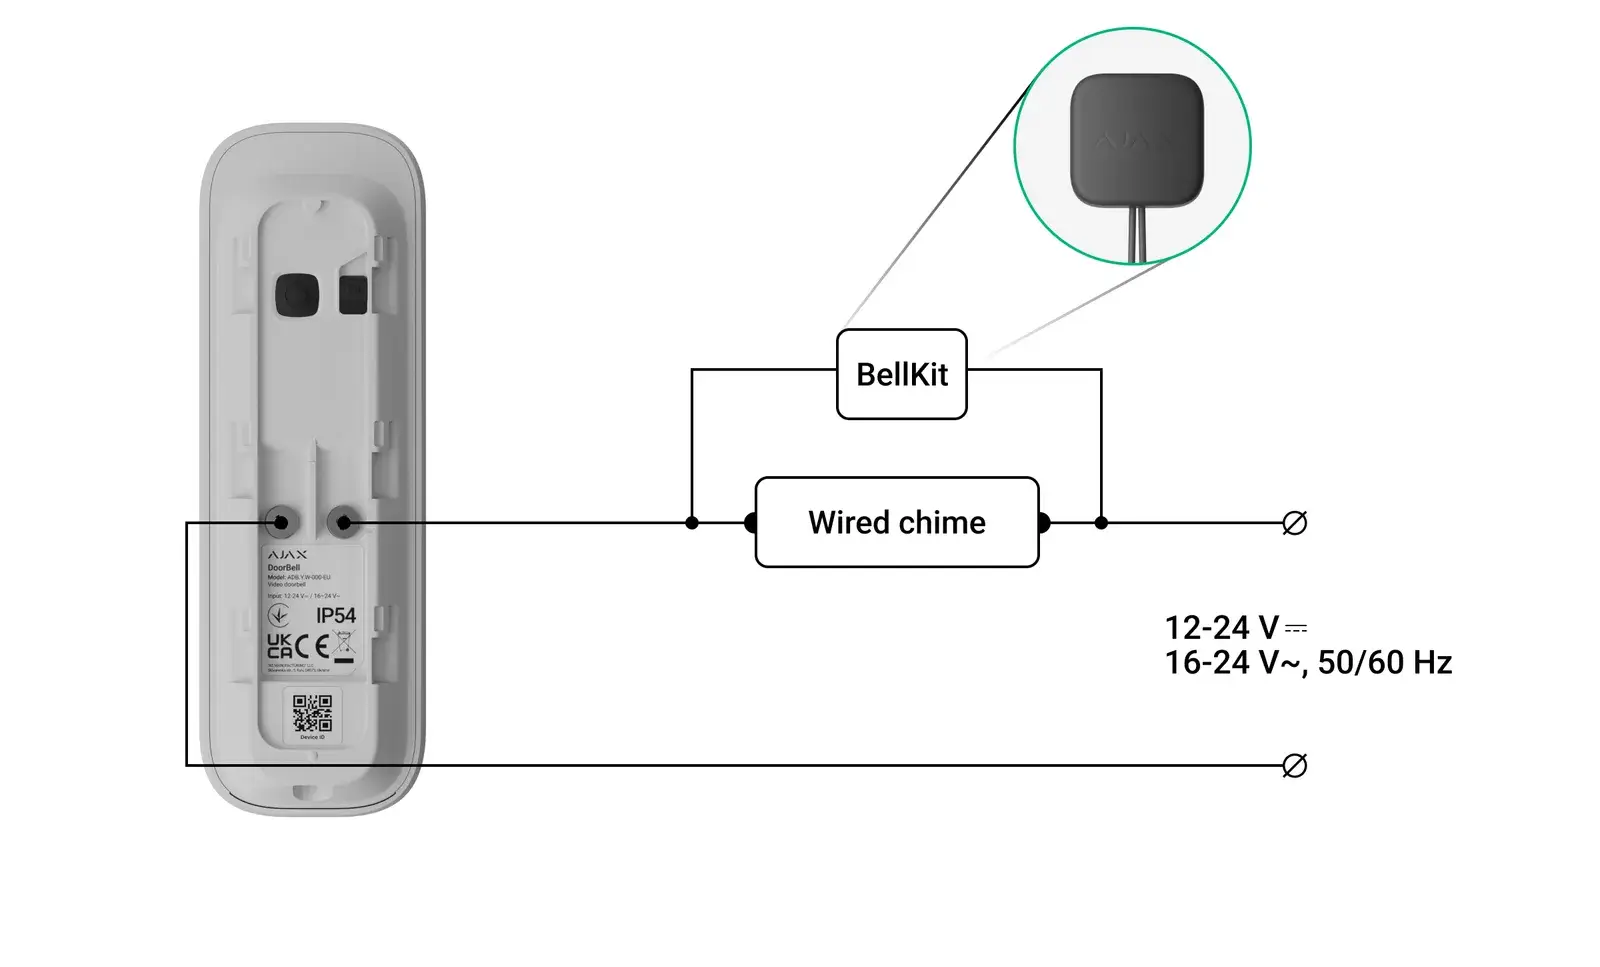
Schematic: Ajax DoorBell in series with a wired chime, BellKit in parallel across the chime, power supply 12-24 V DC or 16-24 V AC

Power supply

With a chime added, the DoorBell needs more: 12-24 V DC with at least 3 A, or 16-24 V AC with at least 10 VA. A standard 8 V bell transformer is too light. Polarity does not matter, the DoorBell detects positive and negative itself.

BellKit at the chime

You mount the BellKit at the chime, across the terminals indicated in the diagram. In the diagrams, black is the bell wire and red is the power wire. For a chime on batteries or with its own power supply, a small relay is placed in between.

Setting up in the app

Add the DoorBell and open Settings, Bell settings. Under Bell type, select Mechanical bell or Digital bell and set the ring duration. Prefer an Ajax siren as a chime? That is in the same menu.

Working safely: first disconnect the power from the bell transformer or power supply, and use the supplied cables with U-clips for the DoorBell terminals. Connecting a new transformer to 230 V is work for an installer.

Honeywell and Friedland

The chimes you are most likely to encounter in the Netherlands. The DC915SCV and DW315S have an A1-A2-B1-B2-AC1-AC2 terminal strip, the Gala D103 and the D117 the classic Friedland 0-F-T-3 strip.

Honeywell DC915SCV on AC voltage (16-24 V AC)
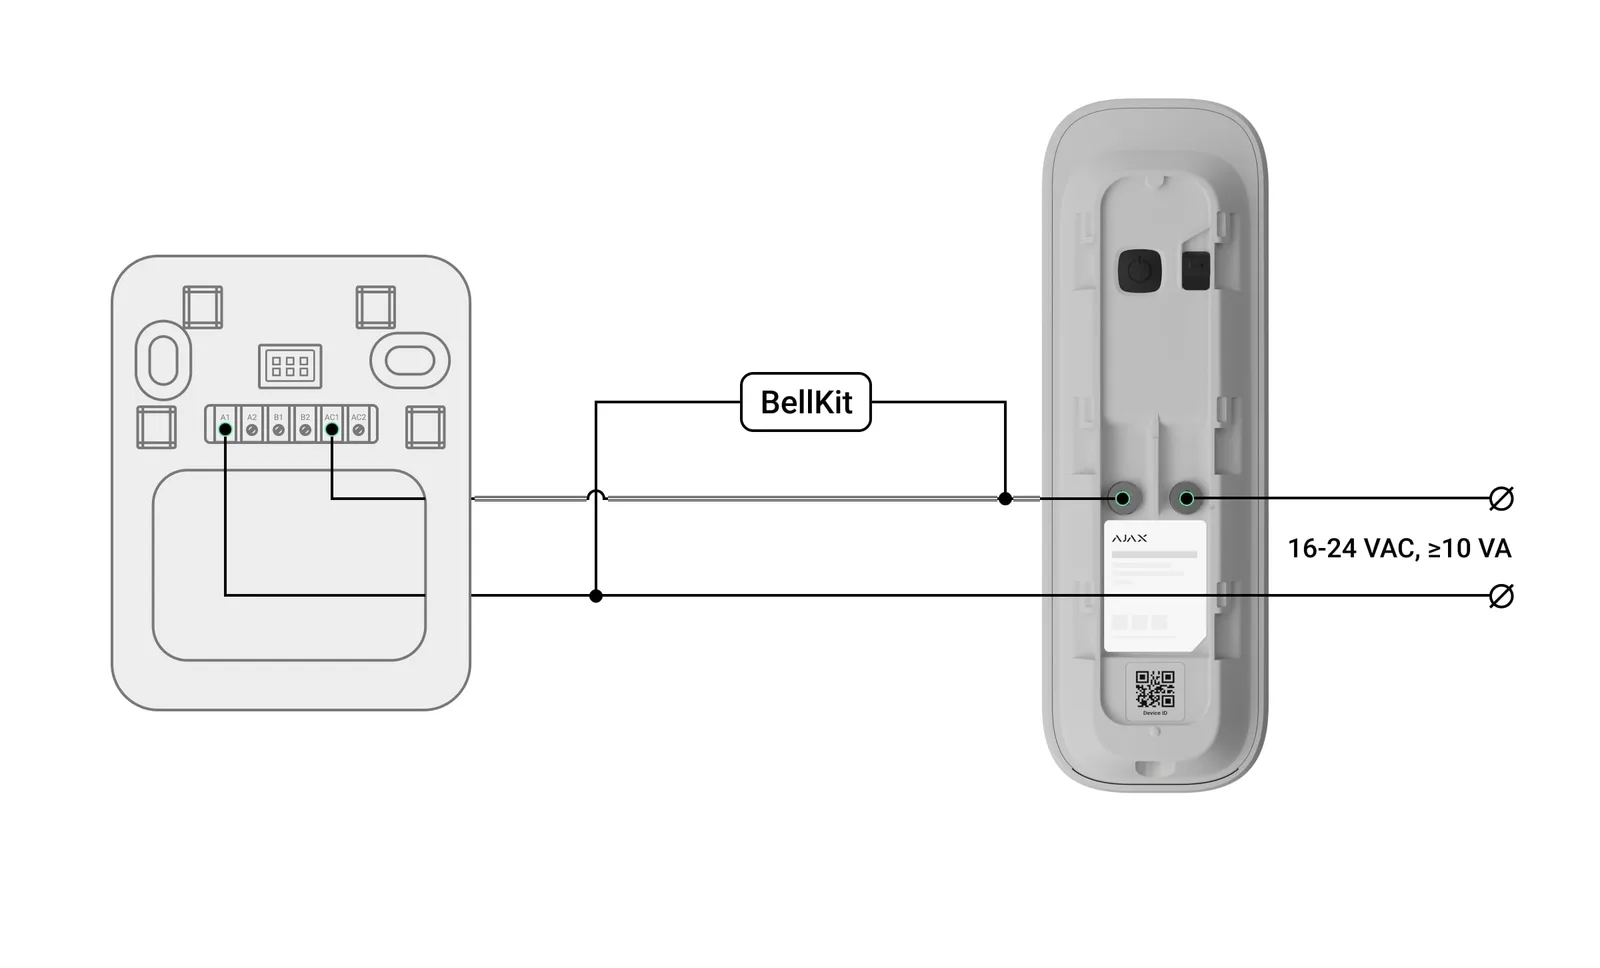
Wiring diagram Ajax DoorBell on Honeywell DC915SCV chime with 16-24 V AC power supply, BellKit across terminals A1 and AC1

The chime is connected to a 16-24 V AC transformer with a minimum of 10 VA. You only use terminals A1 and AC1: the DoorBell is wired in series in the wire to AC1, and the BellKit is placed across A1 and AC1. The other terminals remain free.

Honeywell DC915SCV on direct current (12 V DC)
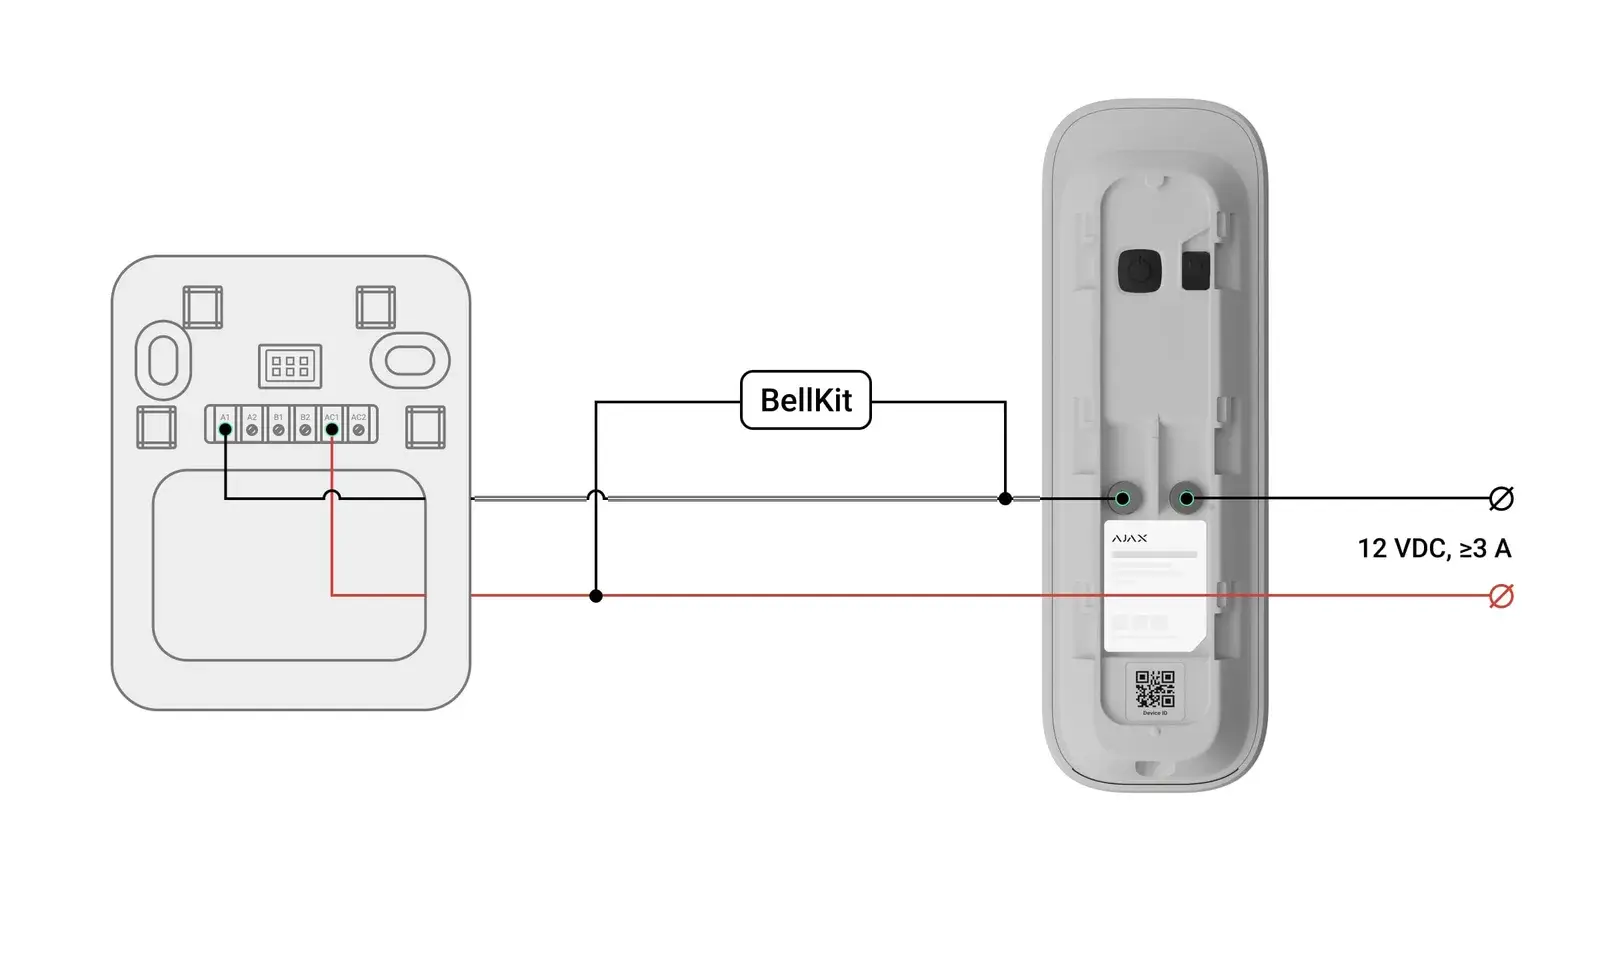
Wiring diagram for Ajax DoorBell on a Honeywell DC915SCV chime with a 12 V DC supply of at least 3 A, BellKit across terminals A1 and AC1

The same chime, but powered with 12 V DC and at least 3 A. Here too, the wires go to A1 and AC1 and the BellKit is placed across those two terminals. Red is the positive wire of the power supply.

Honeywell DW315S on direct current (12 V DC)
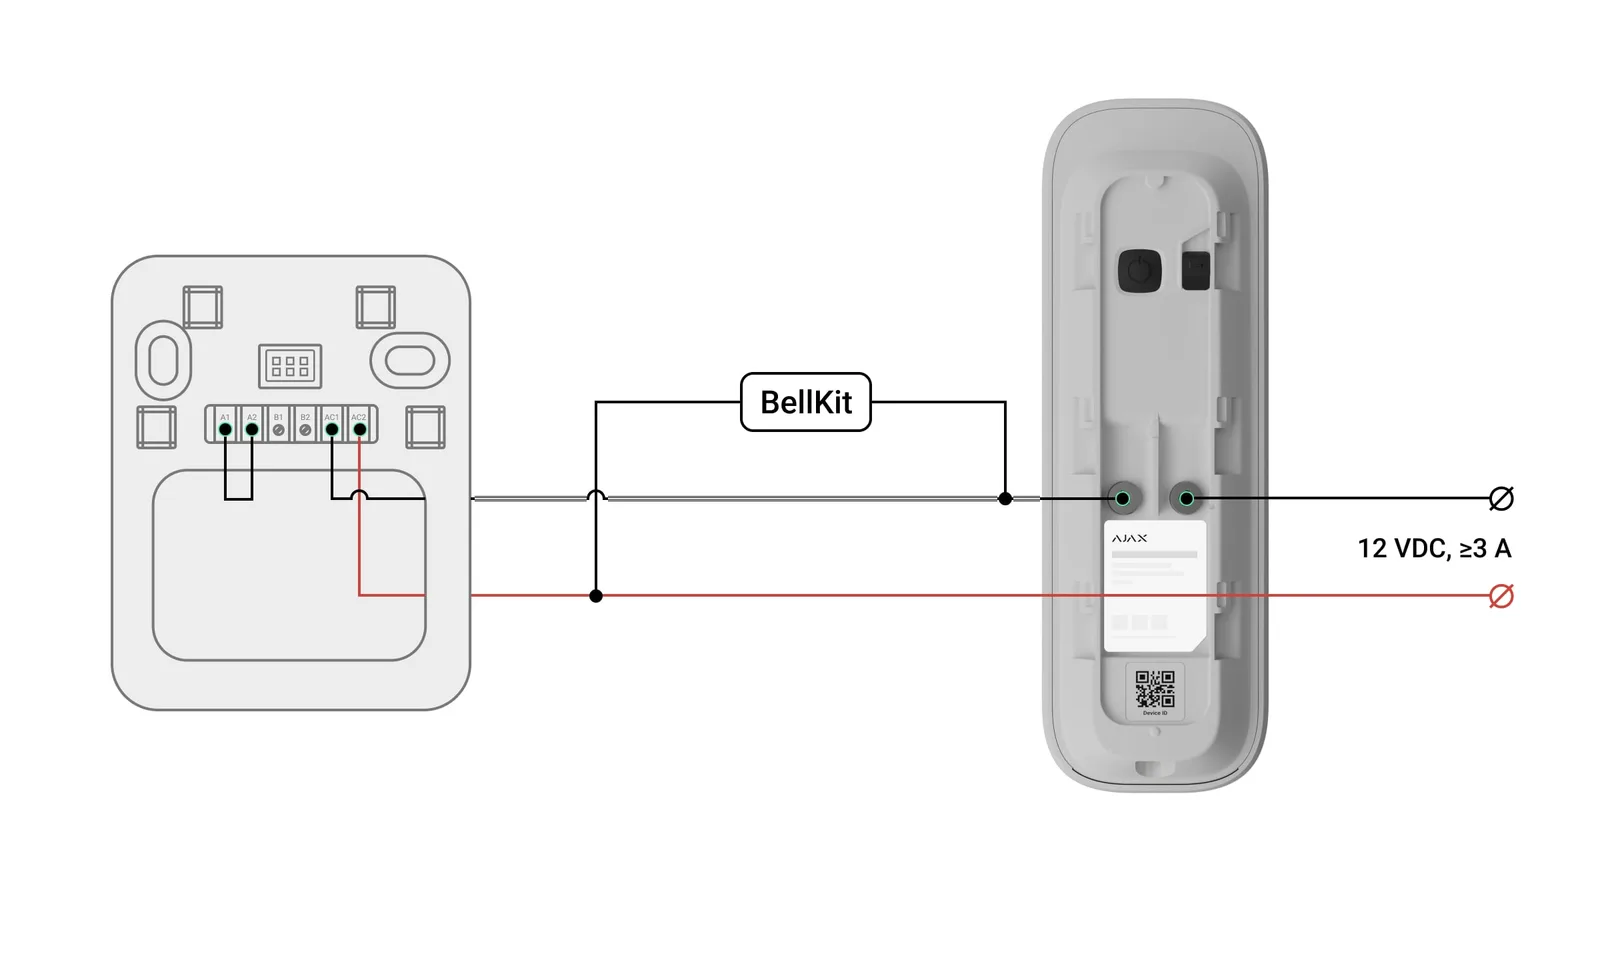
Wiring diagram for Ajax DoorBell on a Honeywell DW315S chime with a 12 V DC supply, wire link between A1 and A2 and connection to AC1 and AC2

On the DW315S, the 12 V DC power supply (at least 3 A) goes to AC1 and AC2: the DoorBell is connected in series in the wire to AC1, and the BellKit is connected across AC1 and AC2. Also make a wire link between A1 and A2, exactly as shown in the diagram.

Honeywell Gala D103 (16 V AC)
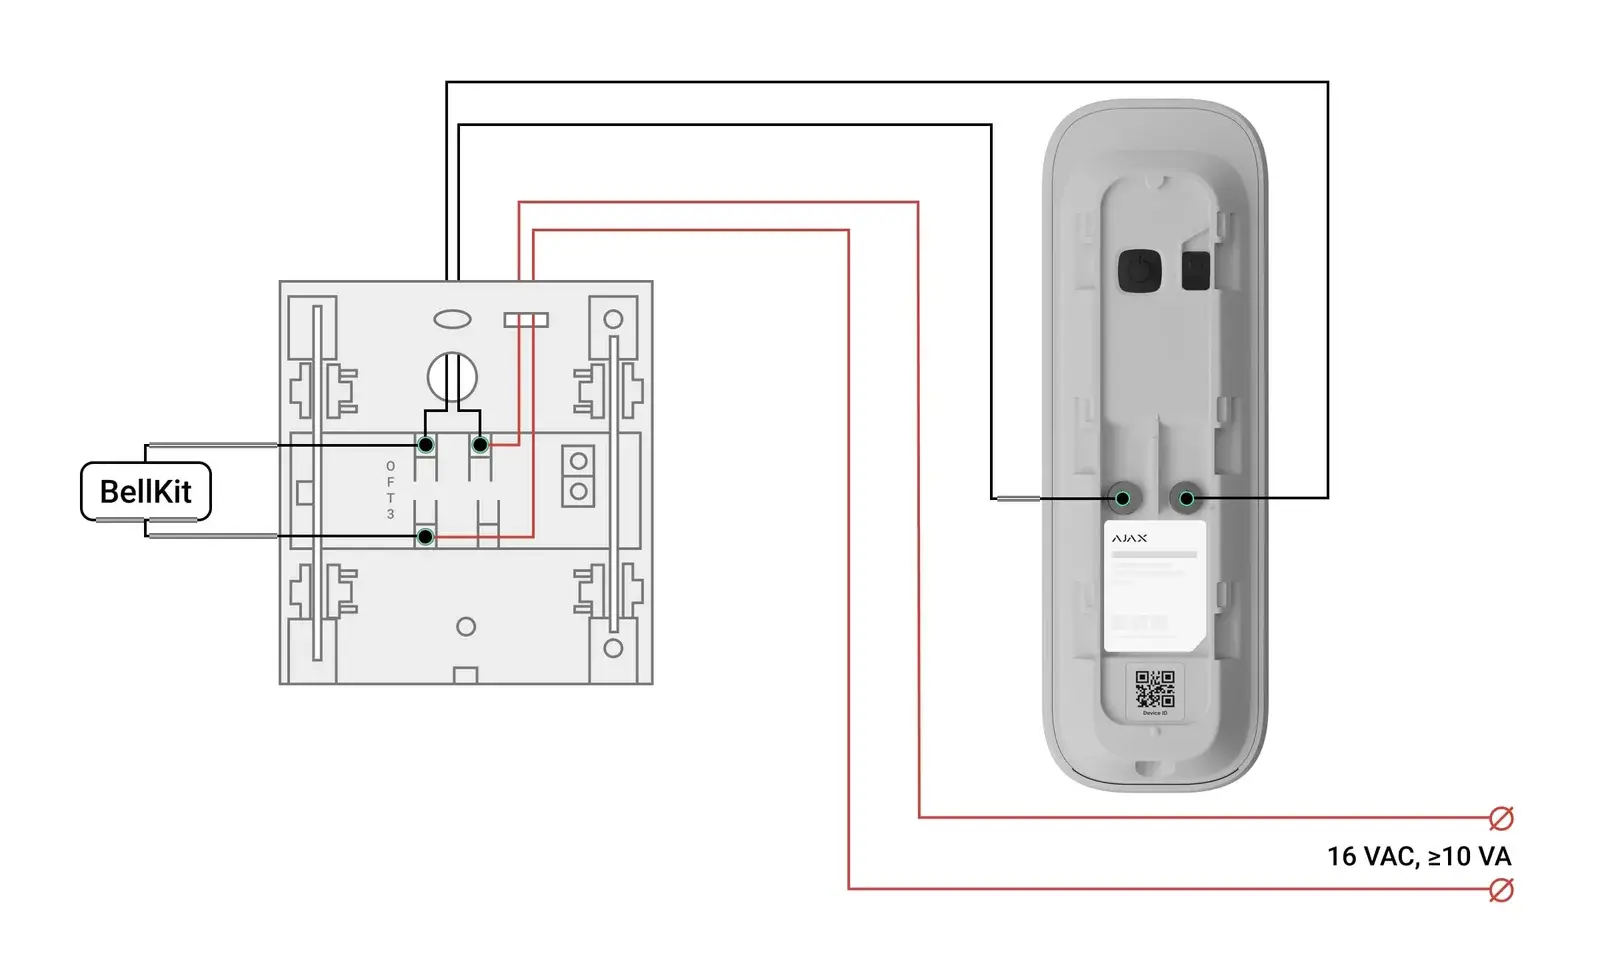
Wiring diagram for Ajax DoorBell on a Honeywell Gala D103 chime with a 16 V AC bell transformer of at least 10 VA and BellKit across the bell terminals

Classic Friedland chime with the 0-F-T-3 terminal strip, on a 16 V AC bell transformer of at least 10 VA. The BellKit is placed across the two terminals indicated in the diagram; the DoorBell takes the place of your old bell push. Follow the colours: black is the bell wire, red the transformer wire.

Honeywell Home D117 (16 V AC), two diagrams
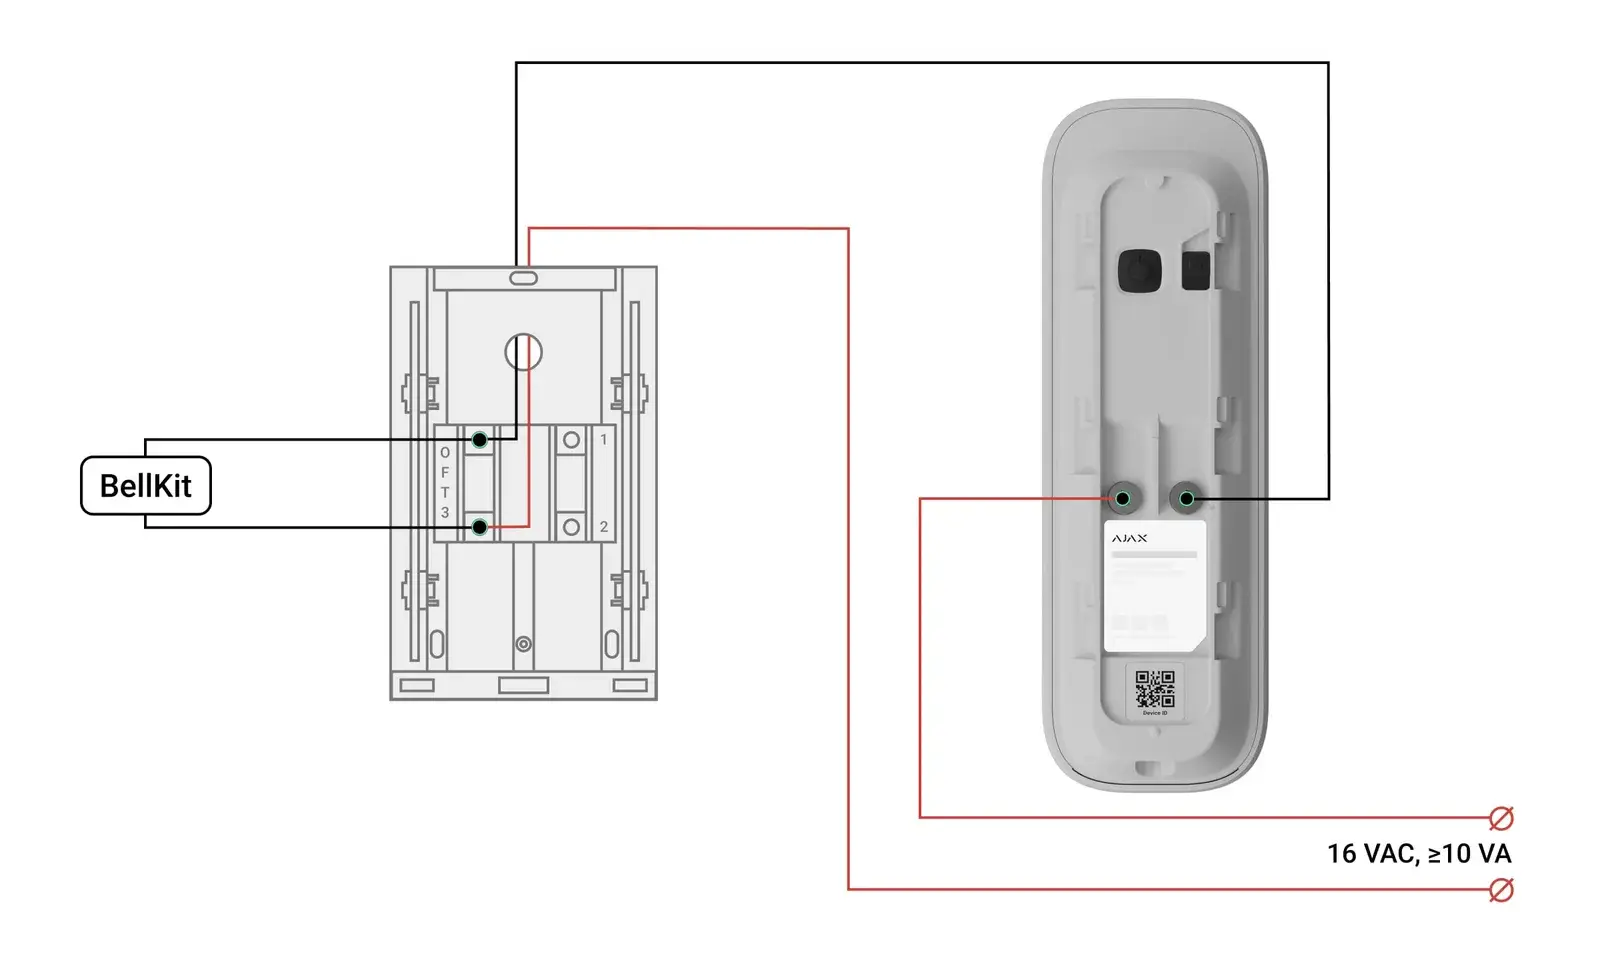
Wiring diagram 1 Ajax DoorBell on Honeywell Home D117 chime: 16 V AC transformer directly on DoorBell and chime, BellKit across the bell terminals

Diagram 1: the 16 V AC transformer (minimum 10 VA) goes directly to the chime and to the DoorBell. The second terminal block (1-2) remains unused.
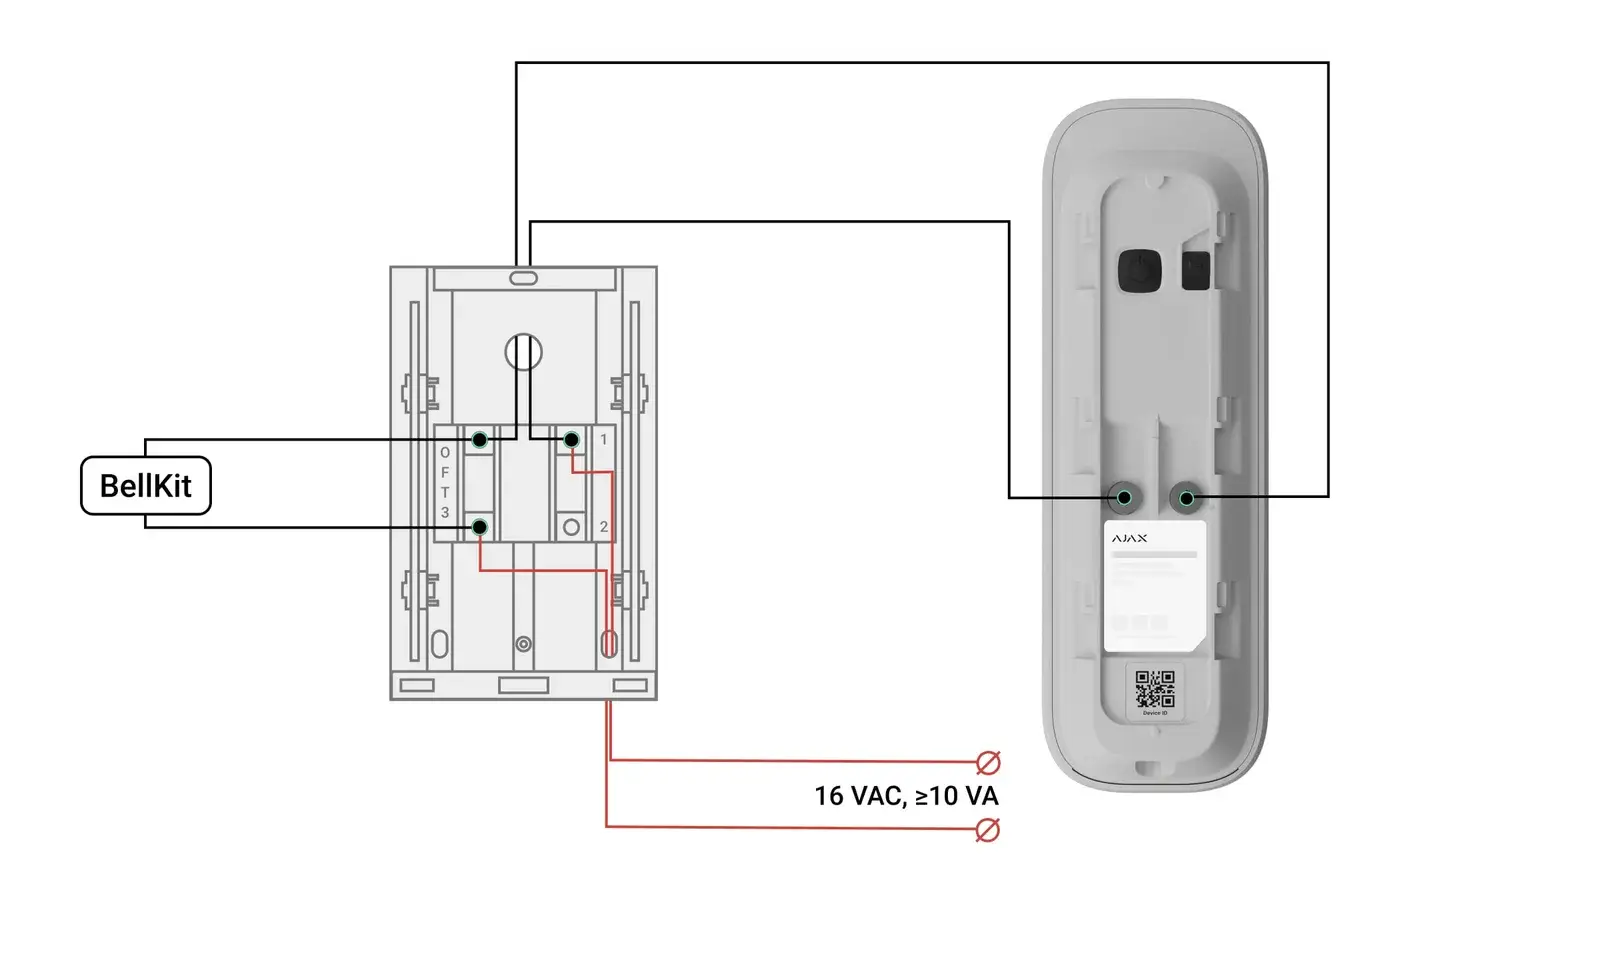
Wiring diagram 2 Ajax DoorBell on Honeywell Home D117 chime: 16 V AC transformer on the terminal block of the chime, DoorBell connected through from the chime

Diagram 2: both transformer wires arrive at the chime, with terminal 1 of the second block as the distribution point, and the DoorBell is connected on from the chime. Choose whichever is most convenient for the wiring that is already in place; in both cases the BellKit is placed across the same two terminals.

Byron

Byron chimes and bells are often found in DIY store sets. Note the difference between a chime on a power supply and a chime on batteries: the latter needs a relay.

Byron 7721 electromechanical bell (12 V DC)
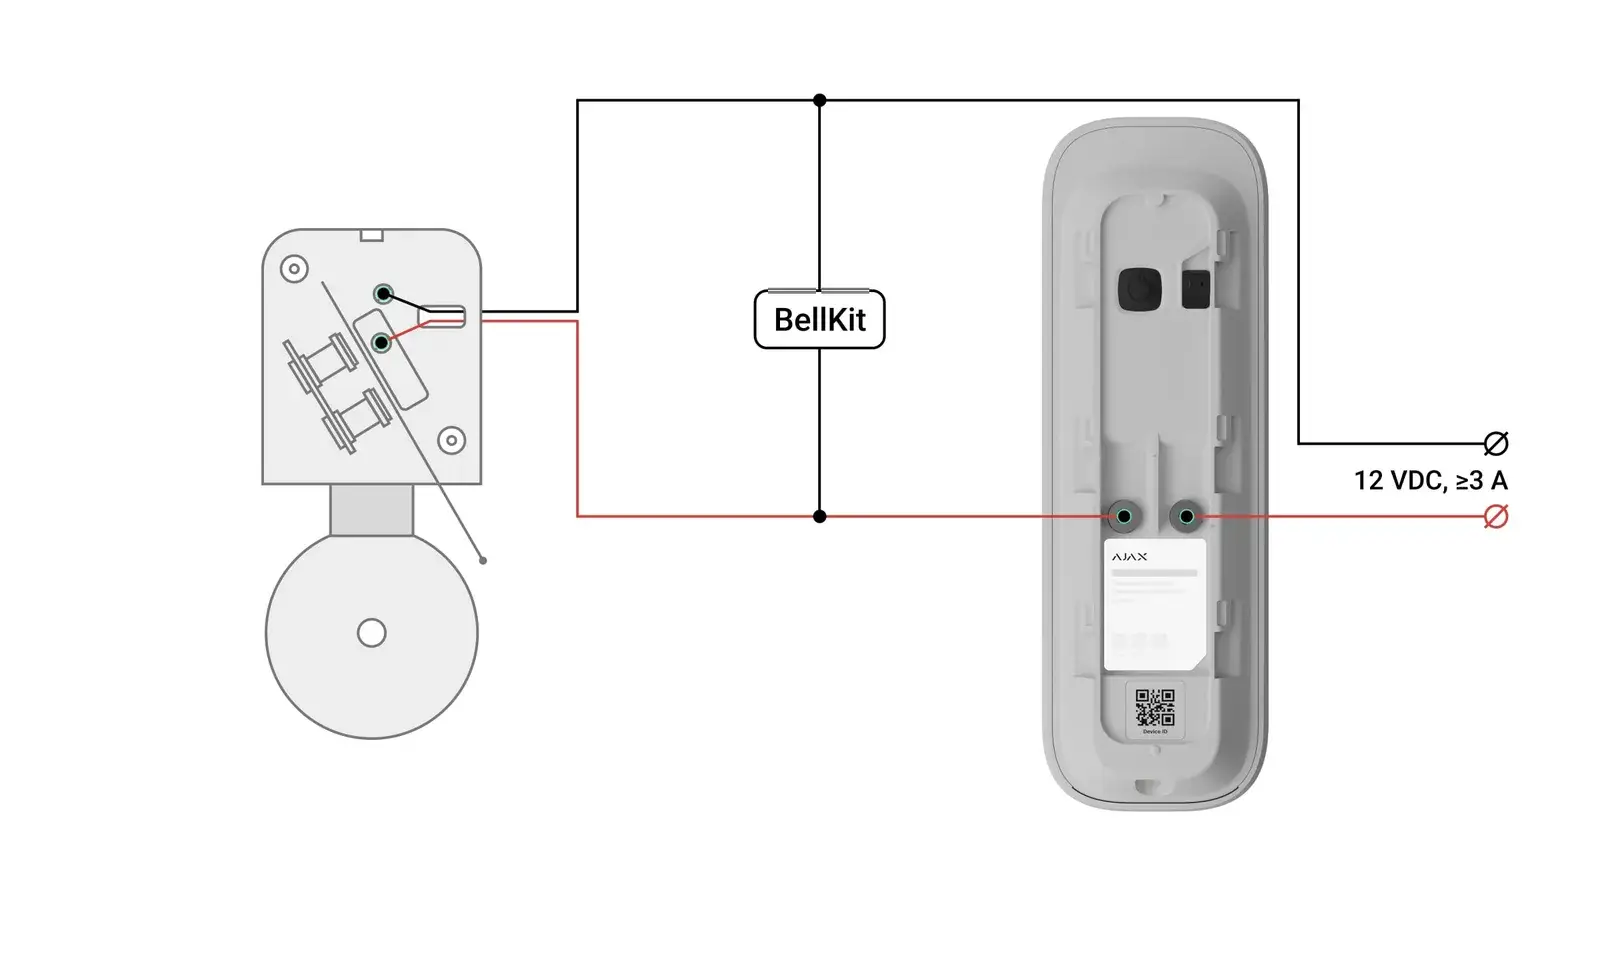
Wiring diagram Ajax DoorBell on Byron 7721 electromechanical bell with 12 V DC power supply of at least 3 A, BellKit across the bell terminals

A classic bell with clapper and chime. Power supply 12 V DC with at least 3 A. The DoorBell is connected in series with the bell, and the BellKit is connected across the two bell terminals.

Byron DBW-24031 on a 12 V power supply
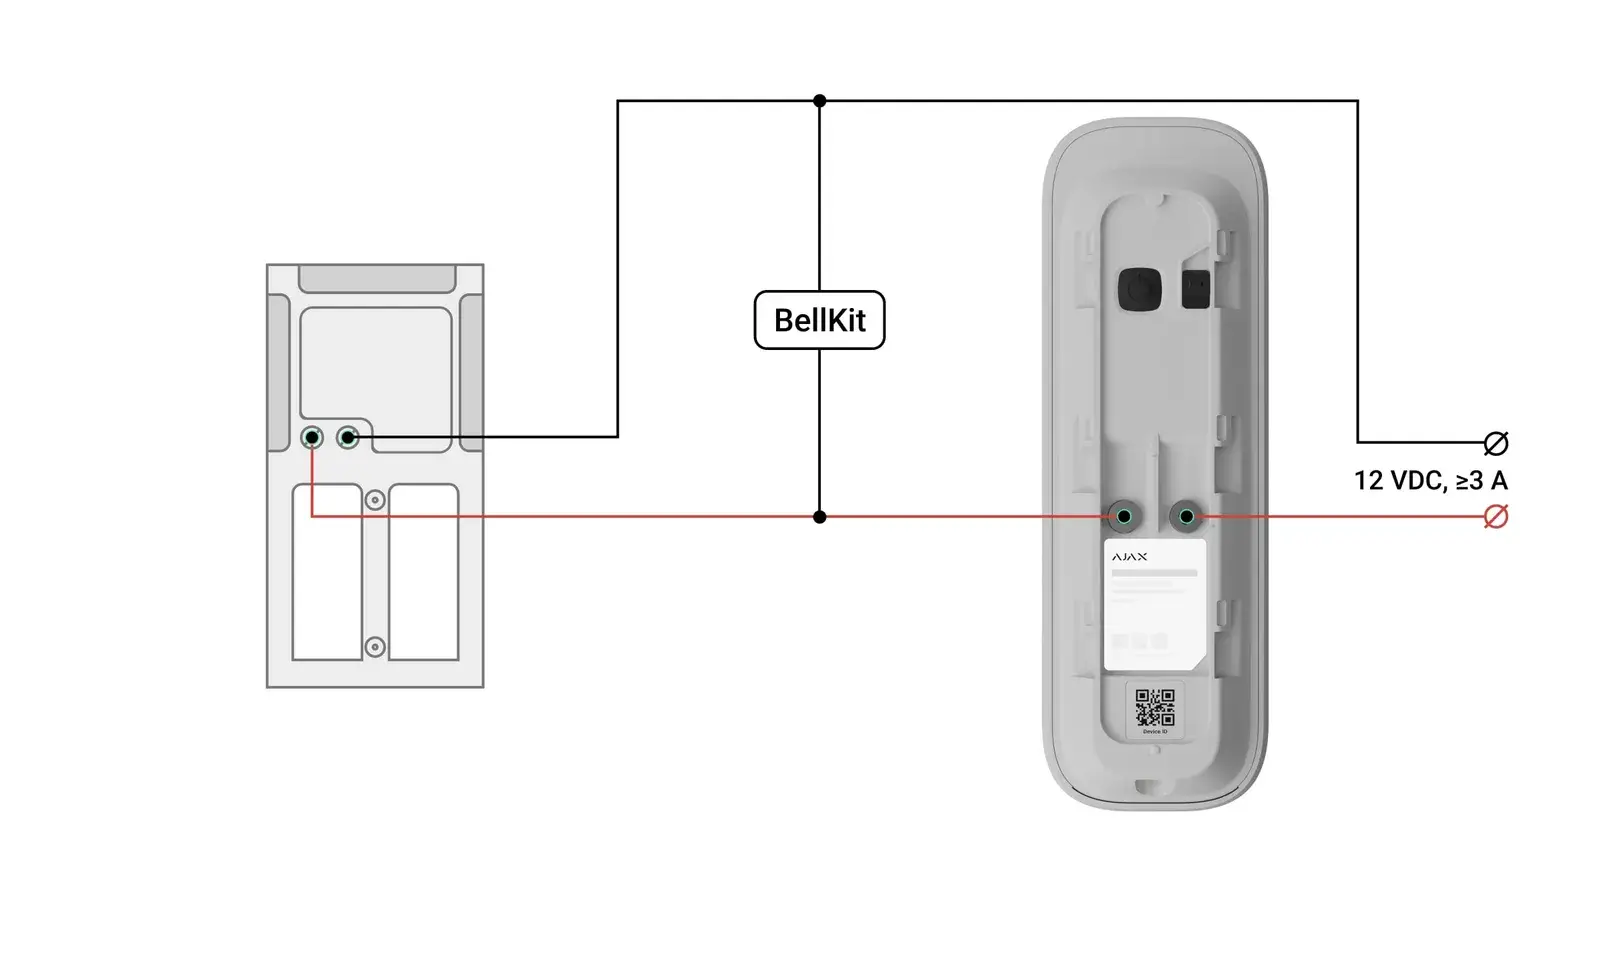
Wiring diagram for Ajax DoorBell on a Byron DBW-24031 chime powered with 12 V DC, BellKit across the chime terminals

The DBW-24031 on a 12 V DC power supply of at least 3 A: the DoorBell in series, the BellKit across the two terminals of the chime. Red is the positive wire.

Byron DBW-24031 battery-powered
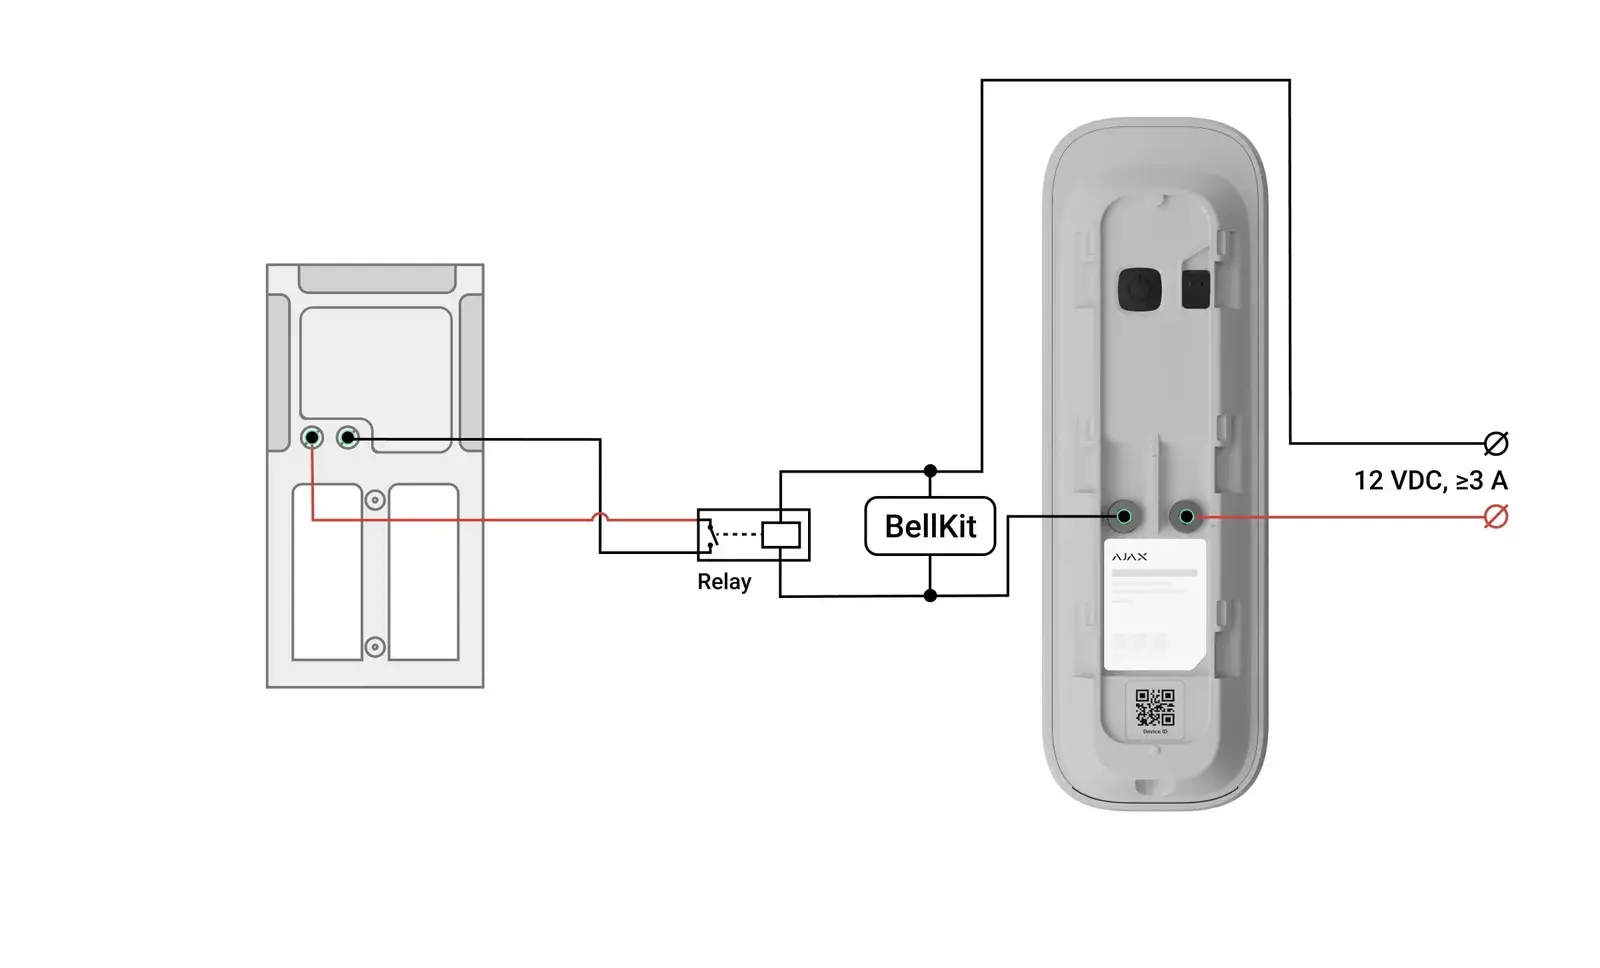
Wiring diagram for Ajax DoorBell on a battery-powered Byron DBW-24031 chime: BellKit drives a relay, the relay contact replaces the push button of the chime

If your chime runs on batteries, it stays that way. The DoorBell gets its own power supply of 12 V DC with at least 3 A. The BellKit drives a relay, and the relay contact is connected to the terminals where the bell push was. This way the chime is not electrically connected to the DoorBell's power supply. The relay is not included in the box; choose a coil that matches the voltage in the diagram.

NuTone

American chimes with separate inputs for the front, side and rear door. Useful if you operate several doors with one chime.

NuTone chime with three buttons (24 V AC)
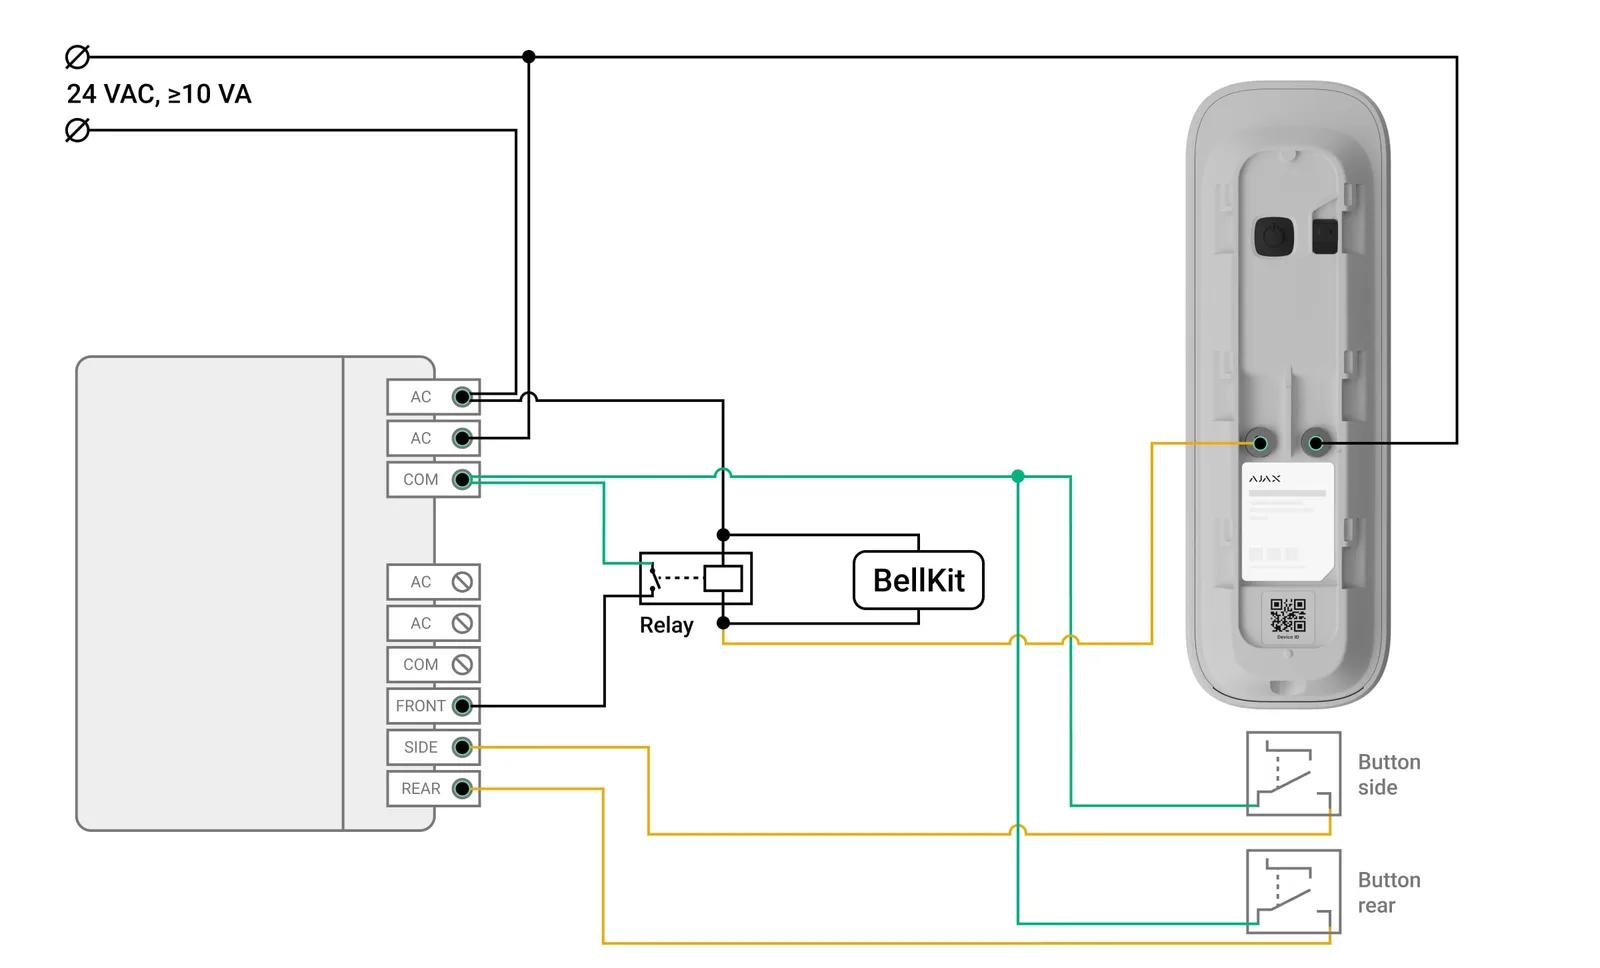
Wiring diagram for the Ajax DoorBell on a NuTone chime with inputs FRONT, SIDE and REAR at 24 V AC, DoorBell via BellKit and relay on FRONT

A chime with the inputs FRONT, SIDE and REAR on a 24 V AC transformer of at least 10 VA. The DoorBell operates the FRONT input via a relay: the BellKit controls the relay, and the relay contact is placed between the transformer wire and FRONT. The push buttons of the side and rear door stay in place. The relay is not included in the box.

NuTone LA11WH, with one or two DoorBells (16 V AC)
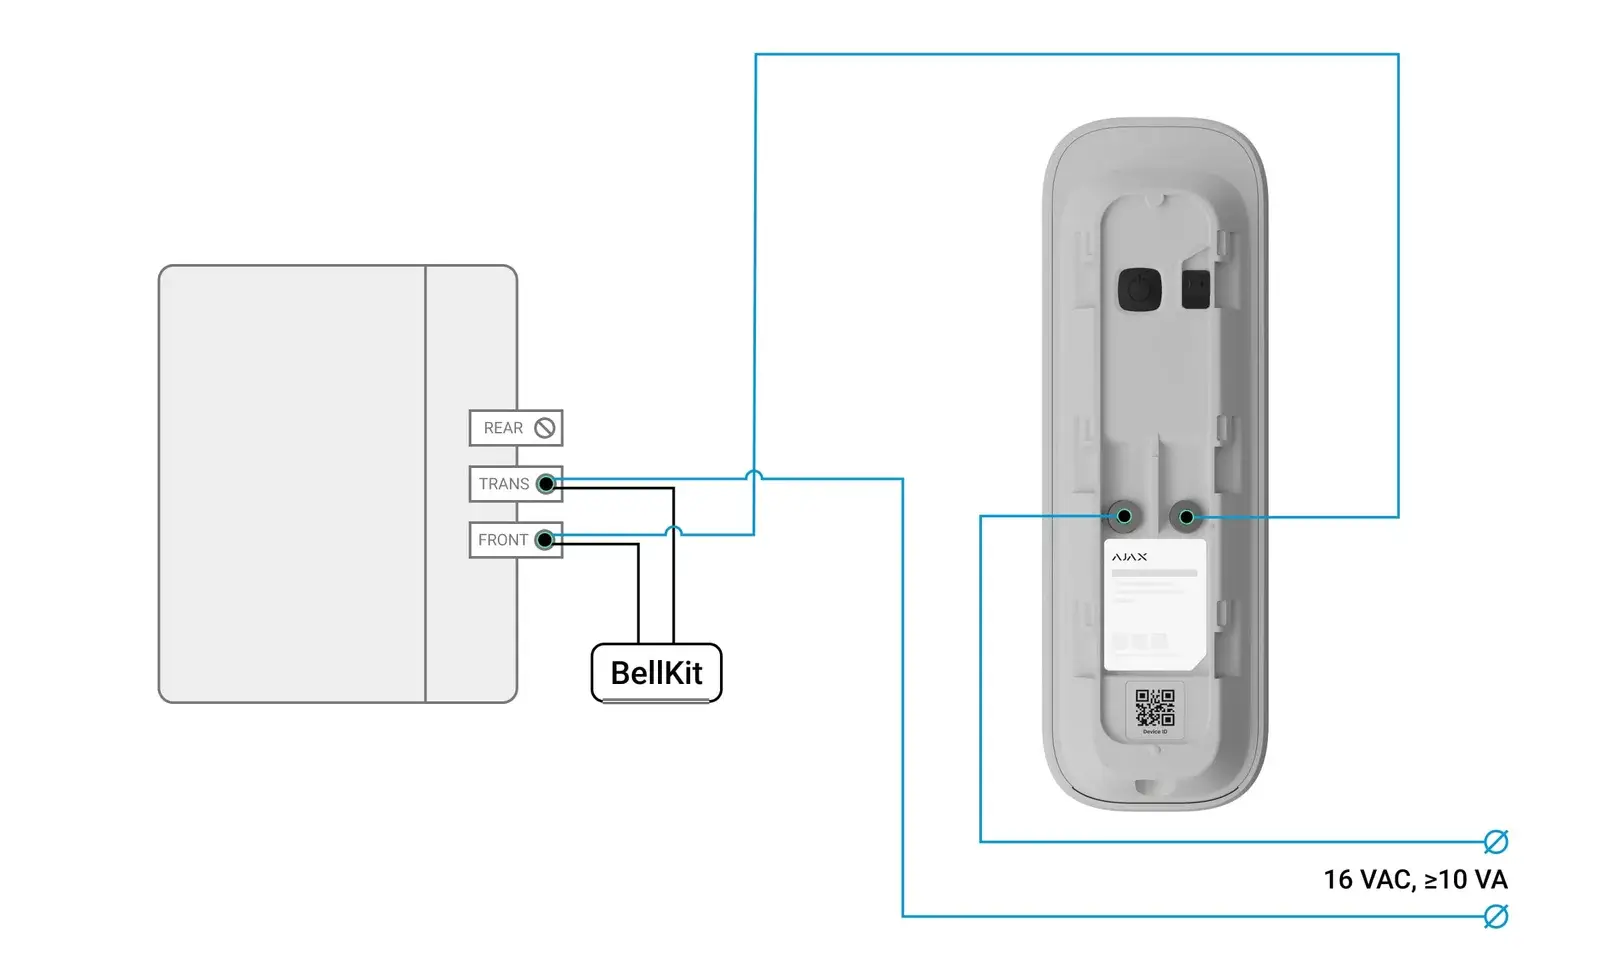
Wiring diagram for an Ajax DoorBell on a NuTone LA11WH chime: DoorBell on FRONT and TRANS with BellKit, 16 V AC supply

One DoorBell: on the FRONT and TRANS terminals, with the BellKit across them; REAR remains free. 16 V AC transformer with a minimum of 10 VA.
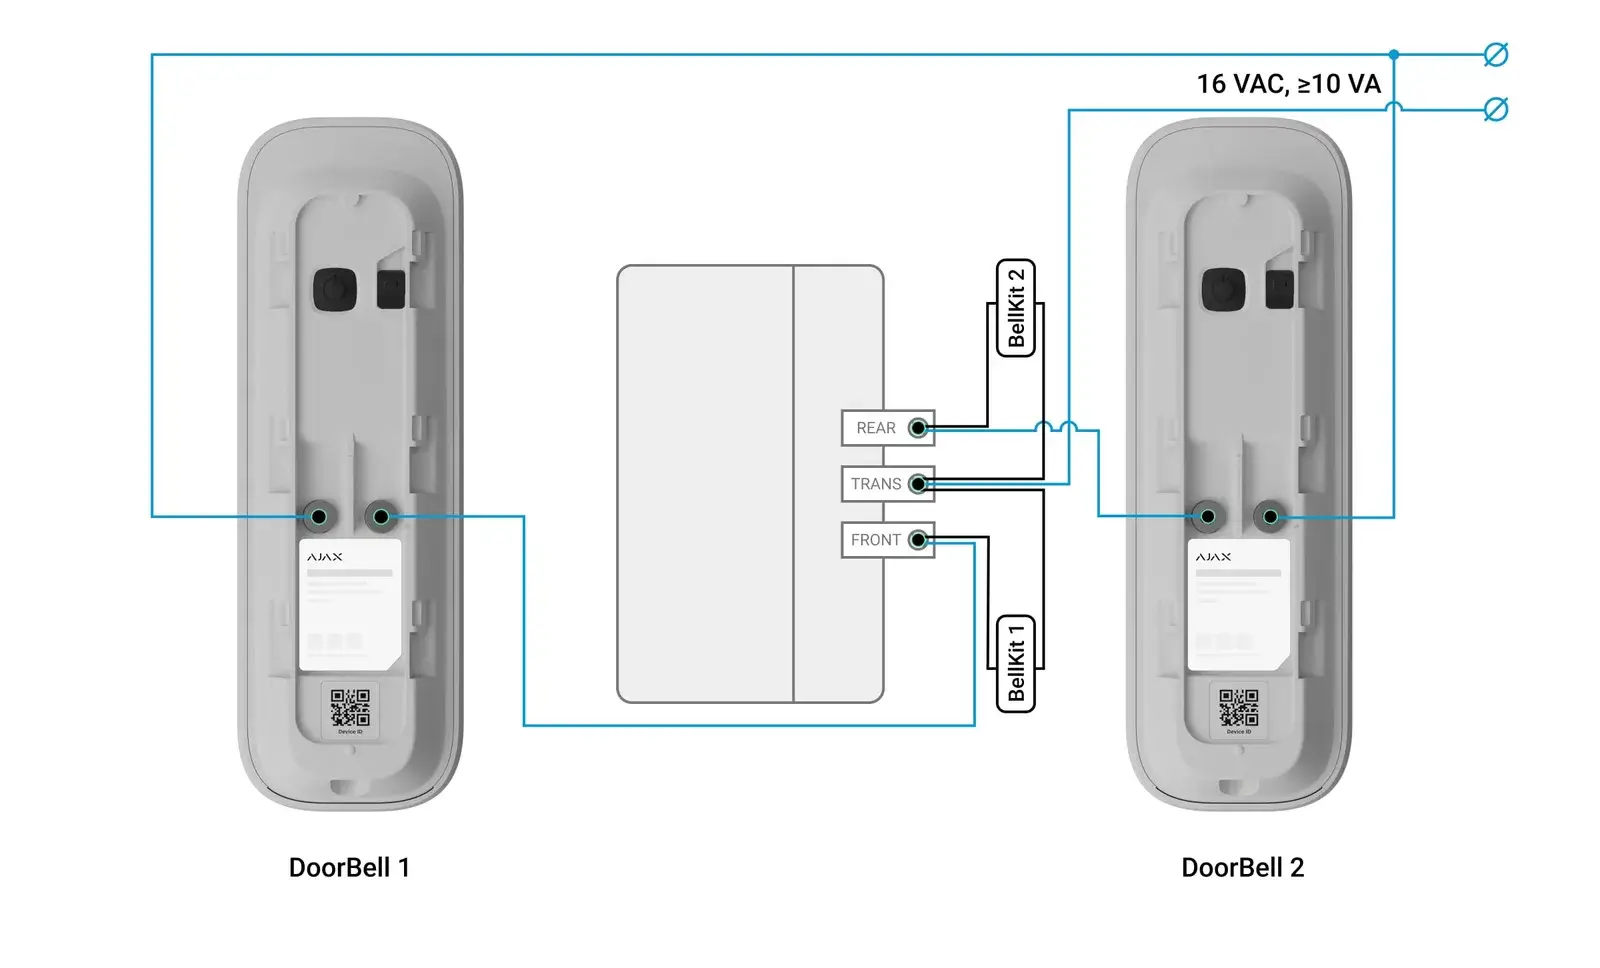
Wiring diagram two Ajax DoorBells on a NuTone LA11WH chime: DoorBell 1 on FRONT with BellKit 1, DoorBell 2 on REAR with BellKit 2, one 16 V AC transformer

Two DoorBells, for example for the front and back door: DoorBell 1 on FRONT with BellKit 1, DoorBell 2 on REAR with BellKit 2, both connected to the same transformer via TRANS. Allow a generous transformer rating: according to the specifications, each DoorBell with a chime requires at least 10 VA.

Other situations

An Aliberti chime, multiple chimes on one bell transformer, and a digital chime on direct current.

Aliberti M-350 II
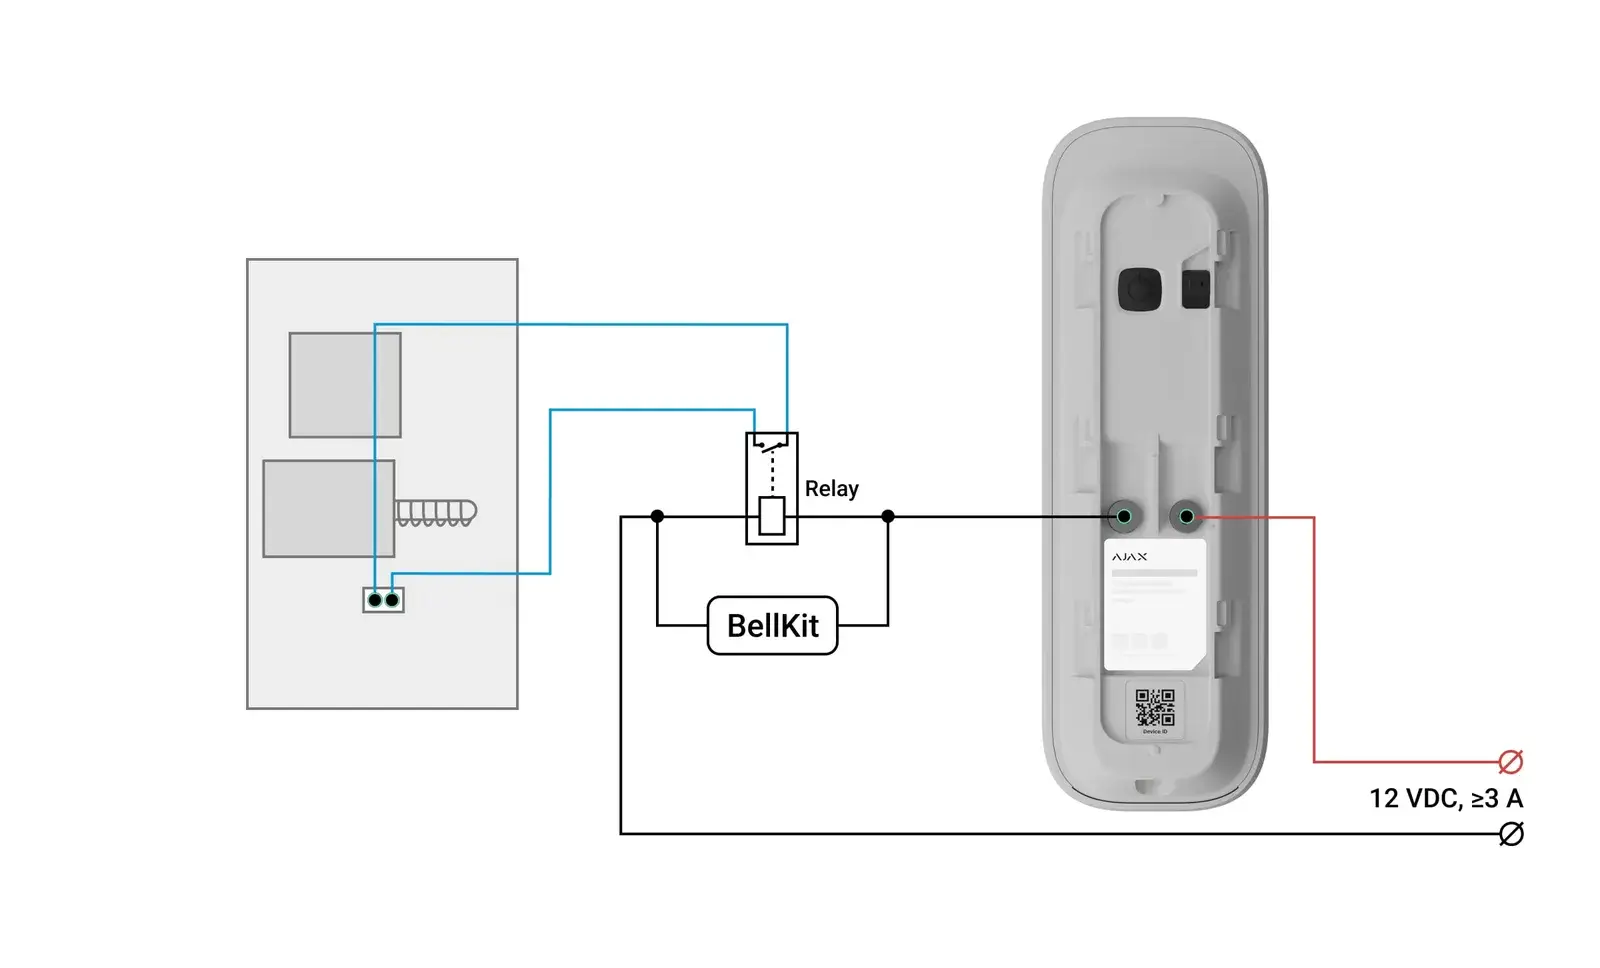
Wiring diagram for Ajax DoorBell on an Aliberti M-350 II chime via BellKit and relay, DoorBell powered with 12 V DC of at least 3 A

Italian chime with a two-pole connection for the bell push; the chime keeps its own power supply. The BellKit controls a relay and the relay contact replaces the push button on the chime. The DoorBell receives 12 V DC at a minimum of 3 A. The relay is not included in the box.

Three chimes on an 8 V bell transformer
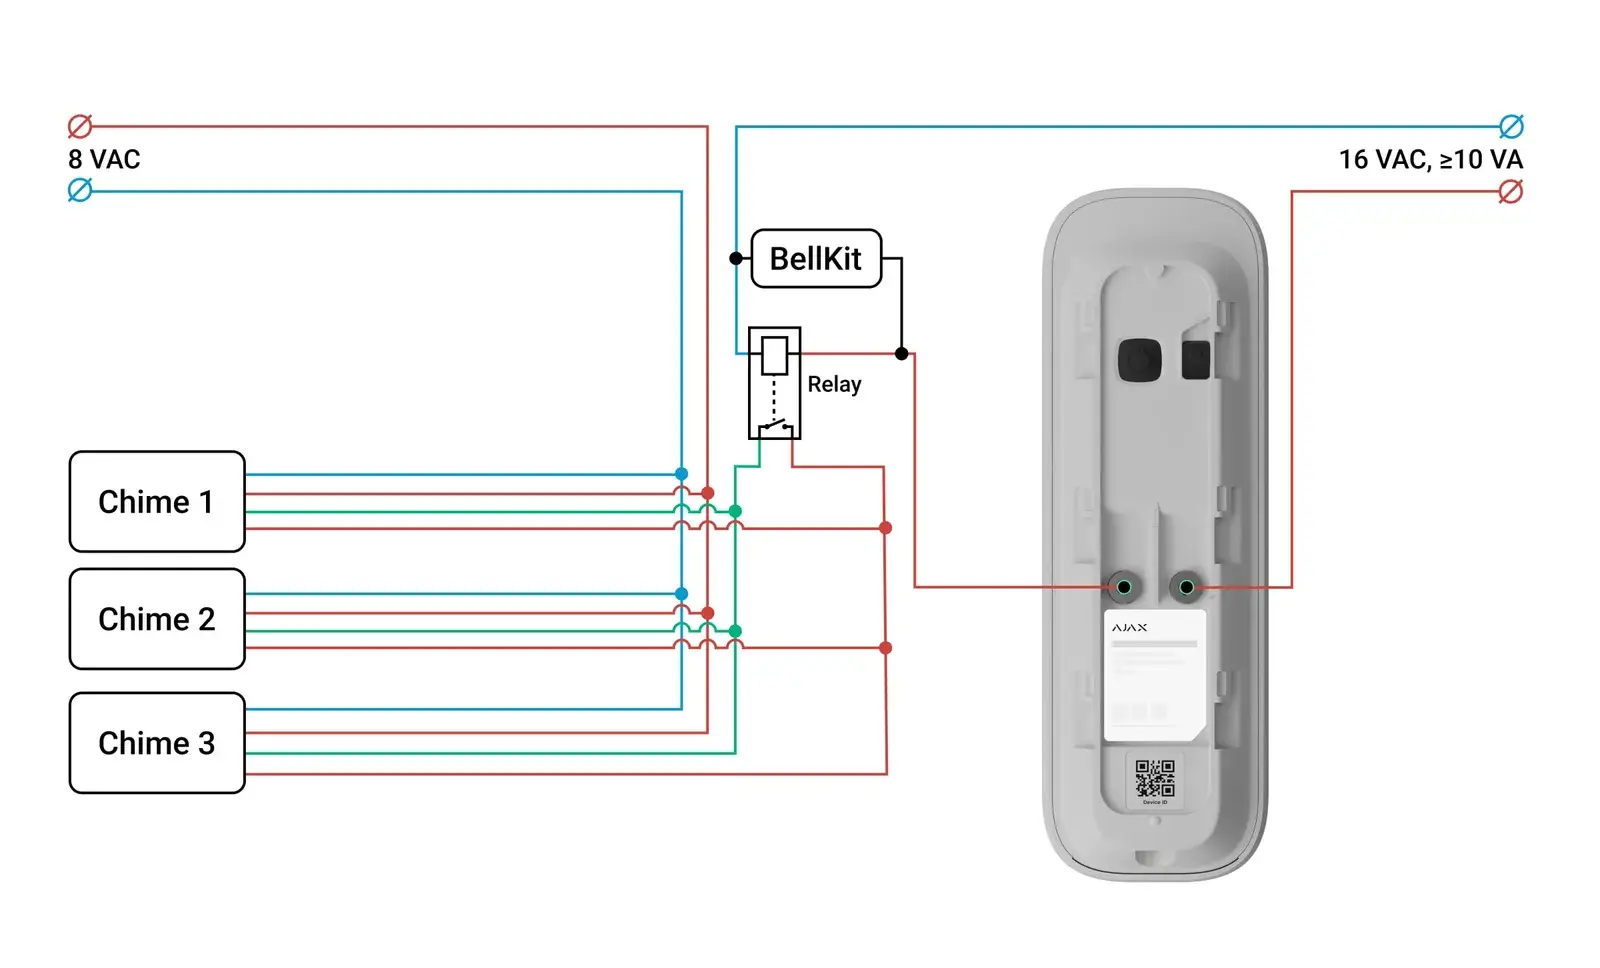
Wiring diagram for Ajax DoorBell on three wired chimes on an 8 V AC bell transformer: separate 16 V AC transformer for the DoorBell, BellKit drives a relay that sounds the chimes

If several chimes (for example downstairs, upstairs and in the shed) are connected to a standard 8 V AC bell transformer, they stay as they are. The DoorBell gets its own 16 V AC transformer with at least 10 VA. The BellKit drives a relay and the relay contact closes the 8 V circuit, so all chimes sound at the same time. The relay is not included in the box; choose a coil that matches the voltage in the diagram and a contact that can handle the bell current.

Digital chime on direct voltage (12 V DC)
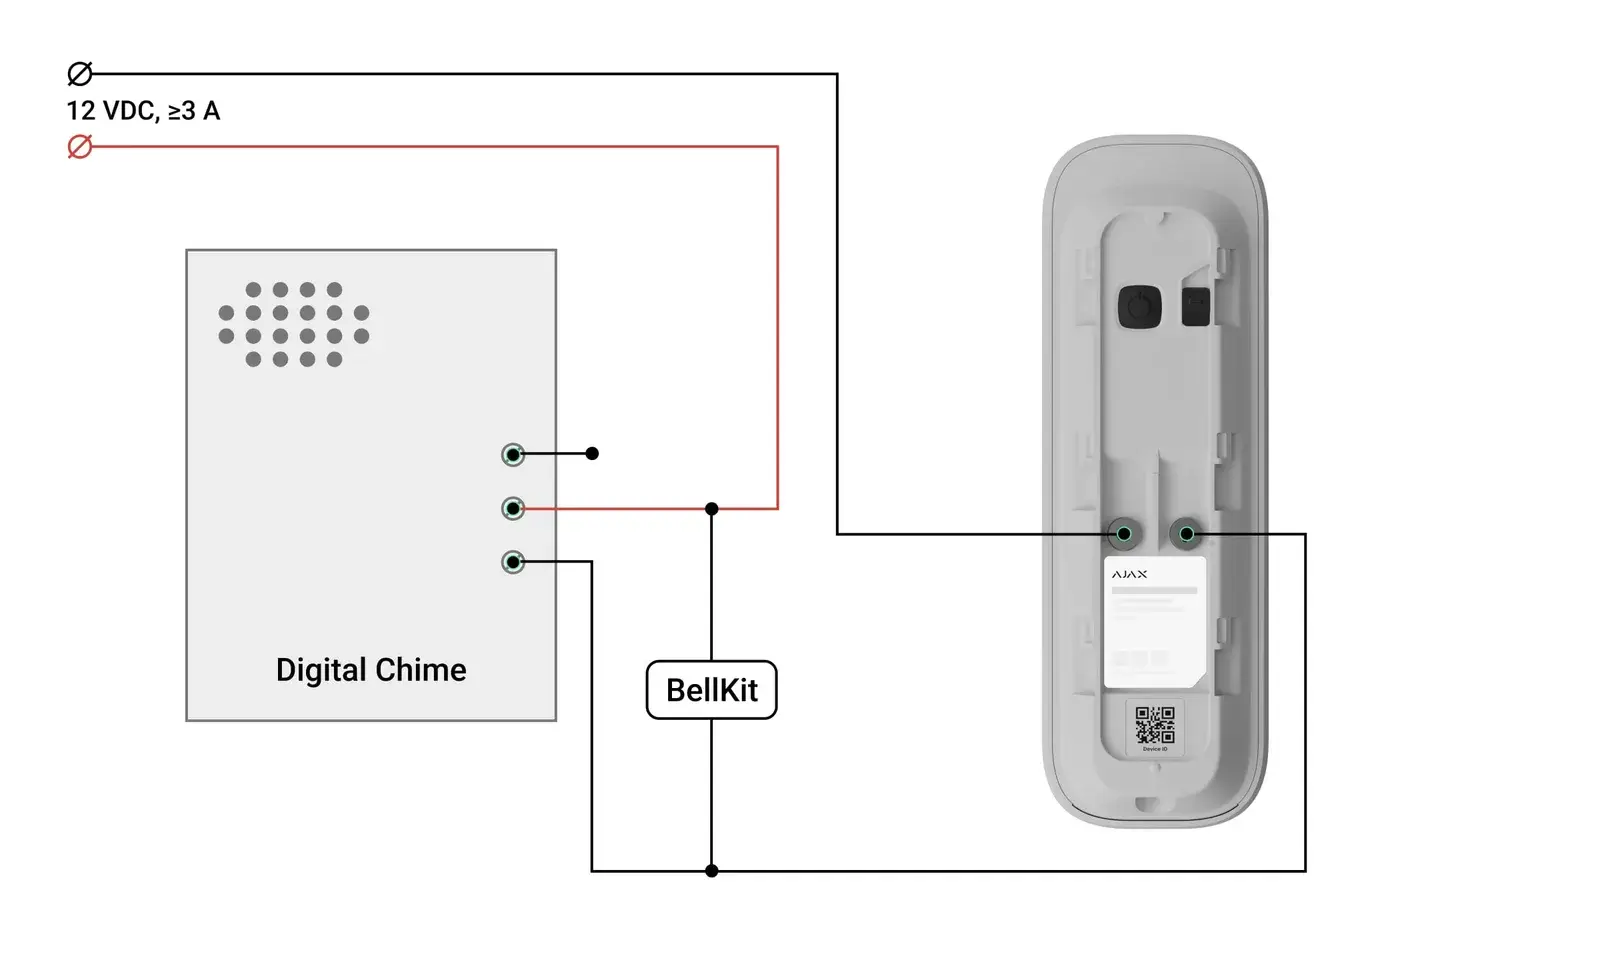
Wiring diagram for Ajax DoorBell on a digital wired chime with a 12 V DC supply, BellKit between the positive of the supply and the control terminal of the chime

An electronic chime with melody and three terminals, powered with 12 V DC (at least 3 A). The positive of the power supply goes to the middle terminal, the bottom terminal runs back to the negative via the DoorBell, and the top terminal remains free. The BellKit is placed between the positive and the bottom terminal. Select Digital bell in the app.

Diagrams: Ajax Systems, DoorBell user manual (updated 11 September 2026). Not sure about your chime? Contact us and we will help you check.

Software

Free Ajax software

Operate and manage your system on any device, without a subscription.

Ajax Security System

The free app for your smartphone: control your system on the go, receive notifications and alarms immediately and watch live footage from your cameras.

Download on theApp StoreGet it onGoogle Play

Ajax Desktop

Manage your entire system from your computer: view all your cameras in one customisable video wall, receive real-time notifications and arm or disarm with a single click.

Download forWindowsDownload formacOS

Ajax TV

View the footage from your security cameras on an Android TV screen and keep your home or business in continuous view on the big screen.

More infoAjax TV

Ajax Media Player

Play back videos that you have saved from your Ajax cameras and use a digital signature to check that the footage has not been tampered with.

More infoAjax Media Player
Specifications

Technical specifications

Video
Camera4 MP CMOS sensor
Resolutionup to 2688 × 1520 px
Camera viewing angles155° / 90°
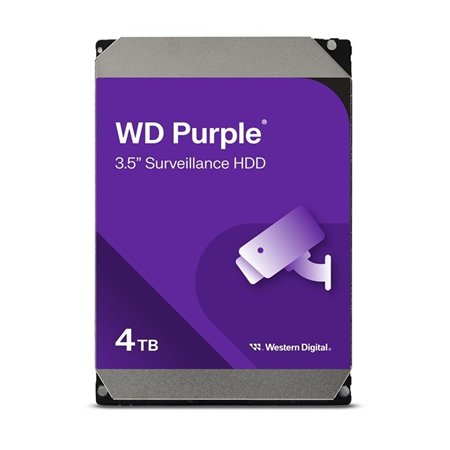
Storage optionsNVR or Ajax Cloud
Video codecH.264
Dynamic rangeHDR
Communication
Wi-Fi and Jeweller2,4 GHz
Microphone✓
Two-way communication✓
Motion detection✓
Object detection✓
Housing
Dimensions145 × 47 × 34 mm
Weight163 g
Temperature range−25 to +60 °C
Humiditymax 90%
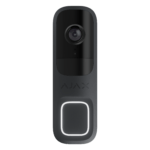
Colours (RAL)White (9003), grey (7004), anthracite grey (7024), black (9005)
Download datasheet (TDS)
Firmware

Siren as chime? Correct firmware required

Do you want to use an Ajax siren as a chime for the DoorBell? If so, make sure you have at least these firmware versions:

HomeSiren Jeweller5.55.1.0 or higher
StreetSiren Jeweller3.73.1.0 or higher
StreetSiren DoubleDeck Jeweller3.73.1.0 or higher

Tip: check and update the DoorBell firmware via the Ajax app for full compatibility.

Compare

Ajax DoorBell compared with Dahua doorbells

Unsure between the Ajax DoorBell and a Dahua video doorbell? The main differences are listed below.

FeatureAjax DoorBellDahua DB41AWDahua VDKP01-kit
Price€ 243,95€ 81,75€ 102,25
Resolution4 MP, up to 2688 x 1520 px4 MP, 2560 x 1440 px4 MP, 2560 x 1440 px
Dynamic rangeHDRDWDR (digital)DWDR (digital)
Night vision (IR)Up to 6 mUp to 10 mUp to 10 m
Wi-Fi2,4 GHz2,4 GHz (Wi-Fi 6)2,4 GHz (Wi-Fi 6)
Local storageNo microSD, via Ajax NVRMicroSD up to 256 GB or NVRMicroSD up to 256 GB or NVR
Cloud storageOptional, Ajax Cloud Storage (paid)None, local via microSD or NVRNone, local via microSD or NVR
Wireless chime includedNoNoYes (DS1AG)
Existing doorbell chimeKeeps working via BellKitDisconnect or bypassDisconnect or bypass
Two-way audioYesYesYes
Protection classIP54IP65IP65
Power supplyExternal 12-24 V DC or 16-24 V AC, with backup battery10-24 V DC or 14-24 V AC, or USB10-24 V DC or 14-24 V AC, or USB
App and ecosystemAjax app, pairs with Ajax alarm systemDahua DMSS appDahua DMSS app
Works standaloneYesYesYes
ColoursWhite, grey, anthracite grey, blackWhite (black: DB41AB)White (black: VDKP01-BG)
ViewThis pageDahua DB41AWDahua kit
Questions

Frequently asked questions about the Ajax DoorBell

Can the Ajax DoorBell work without an external power supply?

No, the Ajax DoorBell is designed to work only with an external power supply. However, the DoorBell has a built-in rechargeable battery that can serve as a back-up for short periods during a power failure. The battery life depends mainly on the ambient temperature of the device, the activation of IR lighting, recording preferences, etc.

No, the Ajax DoorBell only works with 2,4 GHz Wi-Fi networks, because these offer a better signal over longer distances through obstacles such as walls, furniture and glass.

No, DoorBell can only be connected to one Wi-Fi network.

When you connect your DoorBell to the new Wi-Fi network, the device saves the new network details in place of the old ones. The device therefore forgets the old Wi-Fi network.

Yes, you can use the Ajax DoorBell. Please note, however, that recorded videos are not stored. In this case you can only view the video in real time.

Yes, DoorBell can record video continuously, but only if the video is stored on an Ajax NVR.

If DoorBell stores videos in the Ajax Cloud Storage, continuous recording is not available. In this case, DoorBell can only record videos on motion detection or a scenario.

The videos recorded by DoorBell can be stored:
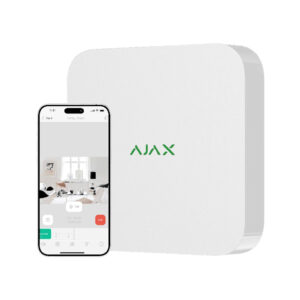
– on an Ajax NVR added to the same network;
– in the archive of Ajax Cloud Storage with a subscription.

The Ajax NVR and the Ajax Cloud Storage can be activated and configured at the same time, so that DoorBell can store recorded video in both.

The Ajax DoorBell has no built-in memory and no slot for a microSD memory card.

There are two options for storing the recorded videos:
– on an Ajax NVR added to the same network;
– in the archive of Ajax Cloud Storage with a subscription.

Because DoorBell can be powered by direct current (12-24 V⎓) or alternating current (16-24 V~, 50/60 Hz), the polarity of the terminals can be either way round. The device detects the positive and negative connections of the power supply and adjusts to them automatically.

Only one user at a time can speak to a visitor via the DoorBell using the app.
While the first user is speaking, other users can only watch the video in real time. Other users can only speak via the app once the first user has finished in their app.

No, the DoorBell has an IP54-beschermingsklasse, which means the device is reliably protected against water. So do not spray it with a garden hose.
As a result, no cover is needed to protect the device from rain when it is installed outdoors.

It is not recommended to install the device in direct sunlight. This can cause it to overheat, which damages the electrical components of the device.

No. If the stolen DoorBell has been added to your space, thieves cannot use it in any way: they cannot add it to a new space or use it to gain access to video recordings or other data.

Yes. The BellKit is included in the box as standard, and you use it to connect the DoorBell to an existing wired doorbell. It can be ordered separately if you need an extra one. Please note that a wired doorbell requires more power: use a power supply of 12-24 V DC with 3 A or more, or 16-24 V AC with 10 VA or more. A standard 8 V bell transformer supplies too little power and is not suitable.

See the wiring examples for thirteen chimes on this page: a diagram with instructions for each brand and type.

No. The DoorBell works standalone or as part of an Ajax alarm system, without a mandatory subscription. If you want to keep recordings, you can store them locally via an Ajax NVR or in the cloud with Ajax Cloud Storage. Cloud storage is an optional, paid service; local storage via the NVR works without a subscription.

The DoorBell has protection rating IP54 and is intended for outdoor mounting, sheltered from direct rain. In a location that is fully exposed to precipitation, we recommend a protective cover. Do not place the DoorBell in direct rainwater for extended periods without a canopy.

Scope of delivery

In the box

Everything for mounting and connection is included, including the BellKit for an existing wired bell.

Ajax DoorBell

The smart video doorbell with 4MP-camera.

SmartBracket mounting panel

For quick, sturdy mounting.

BellKit

Connection to an existing wired doorbell. This is included as standard and can be ordered separately.

2 mounting brackets

Tilt 10° and rotate 25° to set the right angle.

Mounting kit

Screws for all fixing points.

Connection cables

With U-type clamp for a reliable connection.

Quick start guide

Install and pair via the Ajax app.

Additional information

Brand

Ajax Systems

components

Video doorbell

Ajax colour

Anthracite grey (RAL 7024), Grey (RAL 7004), White (RAL 9003), Black (RAL 9005)

Power supply

Application

Outdoor

Documentation for this product

The manufacturer's official documents for this model. They open in a new tab.

DatasheetAjax DoorBell

App for your phone

With the Ajax app you control the system, see the status of each component and receive notifications. Free, for iPhone and Android.

Download on theApp StoreGet it onGoogle Play

Ajax software and manuals

Ajax PRO Desktop is the management software for installers. The manual for each component is available in the support centre.

Download forWindows and MacFind manualAjax Support Centre

12 reviews for Ajax DoorBell

  1. J.s. (verified owner) –

    Has some trouble with registering on the combined 2.4 5 GHz network. Otherwise delivered complete.

  2. F.J.W. (verified owner) –

    High quality, like everything from Ajax alarm systems

  3. Ivan De Meyer (verified owner) –

    Very good camera.

  4. Hayati Tunç (verified owner) –

    Product Sat

  5. Camiel (verified owner) –

    fine and fast

  6. Ivan (verified owner) –

    seems to work fine

  7. Mark Duppen (verified owner) –

    Works intuitively and well

  8. john blondeau (verified owner) –

    works perfectly and is still easy for a layperson to install

  9. Paul Poels (verified owner) –

    Note: this needs 12V – 16V power. Configuration with a traditional "ding-dong" chime did not work. When I ticked "digital bell" in the software it apparently did work, but I get a message that the bell still needs to be configured. But everything works perfectly…

  10. Rudy Schellinger (verified owner) –

    Nice device that meets my high standards. I also took out a cloud storage subscription and am satisfied with the complete package

  11. Aad Van Toor (verified owner) –

    Looks fine. Still needs to be installed.

  12. Rob (verified owner) –

    Excellent help and advice from Peter. The order was delivered very quickly.

Only logged in customers who have purchased this product may leave a review.